from __future__ import print_function
import numpy as np

values = [['a', 'b', 'c'],
          ['e', 'b', 'd'],
          ['a', 'b', 'c']]
np_array = np.array(values)
print (np.unique(np_array[:,1], return_index=False))

# should see: ['b']
Enjoy!
Monday, November 30, 2015
Unique Values from NumPy Array
Here is a quick example of how to get a unique value list from a numpy array.
Friday, November 6, 2015
Extending Python 3.x (online resource)
Who doesn't love C++/C, I sure do....
Here is a great guide to developing all your c/c++ extension here (https://docs.python.org/3.4/extending/).
Happy Coding!
Here is a great guide to developing all your c/c++ extension here (https://docs.python.org/3.4/extending/).
Happy Coding!
Great Blog to Follow (Dan Patterson's GeoNet Blog)
If you have used any ArcGIS software over the years, and asked a question on the Esri or GeoStackExchange Forums you have probably encountered Dan Patterson. He has a great blog, which is full of knowledge any programmer, cartographer or GIS analyst should know.
I don't know the man, but I love reading his posts. I am sure you will too.
The web address is: https://geonet.esri.com/blogs/dan_patterson
Enjoy.
Tuesday, October 27, 2015
ArcREST Help Documentation
ArcREST finally has hosted documentation. Check it out here (http://esri.github.io/ArcREST/index.html)!
Keep on coding.
Keep on coding.
Monday, August 31, 2015
The Walking Metadata (hermes example)
The hermes Python package was released (v1) last week, and now I'm going to show how to read the values instead a given metadata file from a feature class.
In this example, I access the dataset, in this case a feature class. To convert the metadata to a dictionary, call the convert(). Then you can use the dictionary iterator object to walk the data.
This example is just going to show something like:
Enjoy!
import hermes
if __name__ == "__main__":
    fc = r"c:\data_and_maps\usa\census\blkgrp.sdc\blkgrp"
    paperwork = hermes.Paperwork(dataset=fc)
    data = paperwork.convert()
    for k,v in data.iteritems():
        print k, v
In this example, I access the dataset, in this case a feature class. To convert the metadata to a dictionary, call the convert(). Then you can use the dictionary iterator object to walk the data.
This example is just going to show something like:
metadata {some dictionary value}
Enjoy!
Friday, August 28, 2015
Work with metadata check out hermes
So you have to work with metadata? Or you love paperwork, or you just hate using the Python XML packages? Give hermes a try. It is named after And inspired by Hermes Conrad from Futurama.
It is a simple set of tools to translate the Xml to a Python dictionary.
Check it out here: http://github.com/Esri/hermes
Fork it, follow it, improve it.
I'll be posting a couple of usage examples over the next few weeks.
I look forward to everyone's feedback.
Monday, August 3, 2015
ArcREST (v3 beta) manageorg update
On the current master branch, the ArcREST team is up to some good old fashion reworking in the hopes of making life a bit easier when working with portal and AGOL.
In today's push (8/3/2015). The big update is the manageorg sub package is changed to make the user's content iterable.
Let's check out an example:
In today's push (8/3/2015). The big update is the manageorg sub package is changed to make the user's content iterable.
Let's check out an example:
import arcrest
admin = arcrest.manageorg.Administration(url=url,
                                         securityHandler=sh)
user = admin.content.users.user("ARandomUserAccount")
for item in user.items:
    print item.id, item.access, item.owner, item.ownerFolder
    for k in item:
        print k
You'll notice two really interesting things. We are accessing a site with a token handler sh, then we use the for loop syntax to loop through all the items in the root folder. Also, the UserItem object, which is returned from the iterator off of user.items also returns Key/Value pairs from the raw JSON. This means you can get really find grained information from the object, not just what is stubbed out in the class objects.
I would like some feedback on this. It was tons of code changes, and wanted to make sure I didn't drop any functions anyone really needed.
Enjoy!
Friday, July 24, 2015
A Big Thank You And ArcREST Documentation Update!
I want to thank everyone for attending my session. It was great to hear what you are doing, and what you want to do with ArcREST, as well as just meeting all of you. It was exciting to know that I was able to make your workday a little easier and hopefully you can REST a bit better knowing that this package is there to help you out!
I have a lot more work flows to hammer out and ideas to get working on now that I spoke to the users!
While flying back to my home, I pushed out new documentation for the v3.0.0 ArcREST, which can be found here (https://github.com/Esri/ArcREST/tree/master/docs) If you clone the repository, the HTML documentation is pulled down. So update your forks, or re-pull the code to get the latest documentation. I must admit though, I am not the best with Sphinx and Latex, so it's bear bones.
Please feel free to contact me on the issue's page here, or submit a pull request to help make the help documentation look better.
Thank you for attending Esri's UC 2015, attending the ArcREST demo theater presentation, or just talking to me at the developer island. It was a lot of fun to interact with everyone and see all the awesome things people are doing.
Keep on mapping!
~A
Monday, July 20, 2015
ArcREST Exciting Update
The ArcREST team or people.. released v2 final and moved v3 to the main branch on the ArcREST github page.
Why is this exciting? We we continue to take all the feedback we get, especially the comments found here: http://github.com/Esri/ArcREST/issues and improve the package.
Some v3 highlights and what is coming when we finalize v3:
Why is this exciting? We we continue to take all the feedback we get, especially the comments found here: http://github.com/Esri/ArcREST/issues and improve the package.
Some v3 highlights and what is coming when we finalize v3:
- New security handling (PKI, IWA, LDAP)
- AGOL metadata support (adding/updating, downloading, deleting)
- Improved back end code (you won't see it, but it's there)
- Standardized error handler
- 10.4 support
- Python 3 support(separate branch)
- This will be built on top of Python 3.4+
That's some of the what's coming/what's new!
If you are going to the Esri's 2015 User Conference in San Diego, I will be presenting on ArcREST
UC 2015 and ArcREST
The Esri User Conference has started with a flurry of great presentations on what ArcGIS Pro will bring. The first half of Monday's Plenary showed that 3D is here and not a niche market anymore. We live in a 3d world so it is only natural that GIS is moving in that direction. Pro is officially released at v1.1 with a new sdk to modify the program even further. On the web side, smart mapping was shown. For non-cartographic folks out there this is BIG. Mapping that helps you present data properly and logically. Even if you design maps daily, it's nice to have smart mapping there to assist you.
On the ArcREST front, I am presenting on Tuesday @ 1230 in demo theater 11.
Hope to see you all there.
On the ArcREST front, I am presenting on Tuesday @ 1230 in demo theater 11.
Hope to see you all there.
Tuesday, June 30, 2015
The Road Ahead for ArcREST
If you are going to San Diego this year, you can see me in action presenting in the demo theater about ArcREST. I'm going to do some demos, talk about ArcREST basics, and discuss the road ahead. In turn you can ask questions and learn something new.
Here are the details:
12:30 PM - 01:15 PM : Using the ArcREST Python Package on Tuesday 7/21/2015.
As we approach Esri's UC 2015, I wanted to layout what is coming for the next version of ArcREST for those who cannot attend my presentation.
Here is a brief list of what is coming very soon:
Here are the details:
12:30 PM - 01:15 PM : Using the ArcREST Python Package on Tuesday 7/21/2015.
As we approach Esri's UC 2015, I wanted to layout what is coming for the next version of ArcREST for those who cannot attend my presentation.
Here is a brief list of what is coming very soon:
- Ntlm, PKI and LDAP security handlers
- improved backend handling of GET and POST functions
- cleaner code
- additional geometry service functions
- additional query options
and much more...
The biggest focus is supporting ArcGIS server, portal or online sites that do not use the standard username/password token based security.
The ArcREST team is also taking requests for additional functions that we may have missed or didn't include. The project is built around you the user, so help out and log an enhancement request or an issue here. (https://github.com/esri/arcrest/issues).
Tuesday, June 9, 2015
ArcREST Publishing Part 2 - SD Files
The easiest and quickest way to get data into AGOL/Portal is to publish from a service definition file, or SD file. SD files are compressed files using 7-zip. They contain all sorts of information about how your service behaves, what it's name is, the service's data, etc... It's a complete package or all in one file for publishing services.
You can automate the creation of service using Python or AO, but I am not going to dive into that topic. Instead I am going to show how you can easily publish the SD file using ArcREST to your site (AGS, AGOL or Portal).
This example is going to focus on solely the publishing of SD files to AGOL.
I added some additional information to the example here. The basic example ends at the print 'service published' part. The additional code below shows how to enable the editing, export data, sync or track edits. You can do this all in call, but I wanted to show how you enable each one at a time because you may only want to enable one function over another. Notice how I get the feature service URL from the publish() then I take that URL and create a Feature Service object from the agol.FeatureService Class. Since my user is an administrator and owner of the service, I can access the back end function to enable the additional properties. On the Feature Service class, there is a property called administration which takes you to the hostingservice.AdminFeatureService class which allows users to update the service definitions on a hosted feature service.
I threw a lot out there, and I hope it helps!
Previous posts on publishing:
Part 1 - Publish CSV files can be found here.
You can automate the creation of service using Python or AO, but I am not going to dive into that topic. Instead I am going to show how you can easily publish the SD file using ArcREST to your site (AGS, AGOL or Portal).
This example is going to focus on solely the publishing of SD files to AGOL.
import arcrest
import json
import time
#--------------------------------------------------------------------------
if __name__ == "__main__":
    username = "someadminuser"
    password = "reallysecurepassword"
    sd_file = r"C:\temp\1\DemoPublishing.sd"
    proxy_port = None
    proxy_url = None

    #   Connect to the site
    #
    sh = arcrest.AGOLTokenSecurityHandler(username, password)
    admin = arcrest.manageorg.Administration(securityHandler=sh,
                                             initialize=True)
    content = admin.content

    uc = content.usercontent(username)
    ip = arcrest.manageorg.ItemParameter()
    ip.title = "DemoPublishing"
    ip.type = "Service Definition"
    ip.tags = "SD, publishing, example"
    ip.typeKeywords = "Data, Service, Service Definition"

    res = uc.addItem(itemParameters=ip, filePath=sd_file)
    itemId = res['id']
    # Publish the SD File
    #
    resPublish = uc.publishItem(fileType="serviceDefinition",
                                publishParameters=None, itemId=itemId)
    jobId = resPublish['services'][0]['jobId']
    serviceItemId = resPublish['services'][0]['serviceItemId']
    flUrl = resPublish['services'][0]['serviceurl']
    status = uc.status(itemId=serviceItemId, jobId=jobId)
    while status['status'].lower() == "processing":
        time.sleep(2)
        status = uc.status(itemId=serviceItemId, jobId=jobId)
    print 'service published.'
    print 'Bonus Demo - update some additional properties on a feature service'
    flAdmin = arcrest.agol.FeatureService(url=flUrl, securityHandler=sh).administration
    # Bonus 1- Enable edits Only
    updateDefinition = """{"hasStaticData":false,"capabilities":"Query,Editing,Create,Update,Delete","allowGeometryUpdates":true,"editorTrackingInfo":{"enableEditorTracking":false,"enableOwnershipAccessControl":false,"allowOthersToUpdate":true,"allowOthersToDelete":true}}"""
    print flAdmin.updateDefinition(json_dict=json.loads(updateDefinition))
    # Bonus 2- Enable edits with export data - adds 'Extract' to capabilities
    updateDefinition2 = """{"hasStaticData":false,"capabilities":"Query,Editing,Create,Update,Delete,Extract","editorTrackingInfo":{"enableEditorTracking":false,"enableOwnershipAccessControl":false,"allowOthersToUpdate":true,"allowOthersToDelete":true}}"""
    print flAdmin.updateDefinition(json_dict=json.loads(updateDefinition2))
    # Bonus 3- Enable Sync on services - Adds 'Sync' to capabilities
    updateDefinition3 = """{"hasStaticData":false,"capabilities":"Query,Editing,Create,Update,Delete,Sync,Extract","editorTrackingInfo":{"enableEditorTracking":false,"enableOwnershipAccessControl":false,"allowOthersToUpdate":true,"allowOthersToDelete":true}}"""
    print flAdmin.updateDefinition(json_dict=json.loads(updateDefinition3))
    # Bonus 4- Enable editor tracking on service - set enableEditorTracking = True
    updateDefinition4 = """{"hasStaticData":false,"capabilities":"Query,Editing,Create,Update,Delete,Sync,Extract","editorTrackingInfo":{"enableEditorTracking":true,"enableOwnershipAccessControl":false,"allowOthersToUpdate":true,"allowOthersToDelete":true}}"""
    print flAdmin.updateDefinition(json_dict=json.loads(updateDefinition4))
    print 'finished!'
I added some additional information to the example here. The basic example ends at the print 'service published' part. The additional code below shows how to enable the editing, export data, sync or track edits. You can do this all in call, but I wanted to show how you enable each one at a time because you may only want to enable one function over another. Notice how I get the feature service URL from the publish() then I take that URL and create a Feature Service object from the agol.FeatureService Class. Since my user is an administrator and owner of the service, I can access the back end function to enable the additional properties. On the Feature Service class, there is a property called administration which takes you to the hostingservice.AdminFeatureService class which allows users to update the service definitions on a hosted feature service.
I threw a lot out there, and I hope it helps!
Previous posts on publishing:
Part 1 - Publish CSV files can be found here.
Monday, June 8, 2015
Listing Installed Python Packages
Here is a quick two liner bit of code to see what Python packages you have installed. I am running this from the command line. Here is the example:
Enjoy!
>>> import pip
>>> print sorted(["%s==%s" % (i.key, i.version) for i in pip.get_installed_distributions()])
['arcrest==2.0.100', 'astroid==1.3.2', 'boto==2.38.0', 'cffi==1.1.0', 'colorama=
=0.3.3', 'cryptography==0.9', 'enum34==1.0.4', 'idna==2.0', 'ipaddress==1.0.7',
'libarchive==0.4.3', 'logilab-common==0.63.2', 'matplotlib==1.3.0', 'nose==1.3.6
', 'numpy==1.7.1', 'pip==7.0.0', 'pyasn1==0.1.7', 'pycparser==2.13', 'pylint==1.
4.0', 'pylzma==0.4.6', 'pyopenssl==0.15.1', 'pyparsing==1.5.7', 'pyzillow==0.4.0
', 'setuptools==17.0', 'six==1.9.0', 'wheel==0.24.0']
Enjoy!
Wednesday, May 27, 2015
See me at Esri's User Conference 2015
I'm going to be at UC 2015 presenting about ArcREST in the demo theater.
12:30 PM - 01:15 PM : Using the ArcREST Python Package on Tuesday 7/21/2015.
Hope to see you all there!
12:30 PM - 01:15 PM : Using the ArcREST Python Package on Tuesday 7/21/2015.
Hope to see you all there!
Friday, May 22, 2015
ArcREST - New Geoprocessing Model
Today ArcREST has a geoprocessing (GP) update. The changes are minor, but the results are big. The GP objects has been streamline so all the properties are the same.
The above code shows converting a feature class into a GPFeatureRecordSet object that can be given to a task that asks for that type of parameter.
Working with GP services is easy as well.
Example:
Here we accessed a GP service and found a tool we wanted to run. Since we are running the process async, submitJob() was used. The function has additional options, like submitting the result via POST verse GET, etc...
Enjoy
Example of GPObject in Action:
import arcrest
# convert a feature class to a GPFeatureRecordSet
gpfrs = arcrest.ags.GPFeatureRecordSetLayer.fromFeatureClass(r"c:\temp\grid.gdb\sample", paramName="parameterName on GP tool")
Working with GP services is easy as well.
Example:
import arcrest
if __name__ == "__main__":
    sh = arcrest.AGSTokenSecurityHandler(username="user",
                                         password="password",
                                         token_url="http://site:6080/arcgis/admin/generateToken"
                                         )
    url = "http://site:6080/arcgis/rest/services/gp/scriptmv/GPServer"
    gp = arcrest.ags.GPService(url=url,
                               securityHandler=sh)
    for task in gp.tasks:
        if task.name.lower() == "":
            # submit the job
            job = task.submitJob(inputs=None)
            # wait till the job finishes
            while job.jobStatus != "esriJobSucceeded": pass
            # get the job results
            results = job.results # do something here.
Here we accessed a GP service and found a tool we wanted to run. Since we are running the process async, submitJob() was used. The function has additional options, like submitting the result via POST verse GET, etc...
Enjoy
Wednesday, May 20, 2015
ArcREST Publishing Part 1 - CSV Files
One of the main purposes of ArcGIS.com is that is allows you to share information. Sometime you want to quickly stage content, or you want to mirror your site in another location.
Let's discuss the above code. Here we access AGOL and add an item for our user. Once uploaded, the code, using the item id, analyzes the CSV to get a set of default publishing parameters. These parameters are used to populate the PublishCSVParameters class in order to publish the CSV file correctly.
Pretty cool. ArcREST masks a complex work flow into a couple of short lines of Python code.
So in this post, I will show you how to do some publishing. Publishers can create feature services as well as tiled map services.
Feature services can be created using input files of type csv, shapefile, serviceDefinition, featureCollection, and fileGeodatabase.
The AGOL/Portal REST has some great bullet points to remember when publishing items:
The AGOL/Portal REST has some great bullet points to remember when publishing items:
- CSV files that contain location fields, (ie.address fields or X, Y fields) are spatially enabled during the process of publishing.
- Shapefiles and file geodatabases should be packaged as *.zip files.
- Tiled map services can be created from service definition (*.sd) files, tile packages, and existing feature services.
- Service definitions are authored in ArcGIS for Desktop and contain both the cartographic definition for a map as well as its packaged data together with the definition of the geo-service to be created.
- Use the Analyze operation to generate the default publishing parameters for CSVs.
Now that we have what we can publish, it is time to start coding!
This post will cover publishing CSV files.
CSV files require a bit more steps then the other publishing work flows because not only do you have to upload your data, you should analyze it in order to get a correct set of default publishing properties. Luckily, ArcREST can ease the pain.
CSV files require a bit more steps then the other publishing work flows because not only do you have to upload your data, you should analyze it in order to get a correct set of default publishing properties. Luckily, ArcREST can ease the pain.
import arcrest

if __name__ == "__main__":
    username = "some account"
    password = "some password"
    csv_file = r"C:\Users\andr5624\Desktop\book1.csv"

    sh = arcrest.AGOLTokenSecurityHandler(username, password)
    admin = arcrest.manageorg.Administration(securityHandler=sh)
    content = admin.content
    usercontent = content.usercontent(username=username)
    ip = arcrest.manageorg.ItemParameter()
    ip.title = "Sample CSV"
    ip.type = "CSV"
    ip.tags = "tag1,tag3"
    res = usercontent.addItem(itemParameters=ip,
                              filePath=csv_file)
    itemId = res['id']

    #  Now you need to analyze the item to publish it
    #
    featureContent = content.featureContent
    analyzeParams = arcrest.manageorg.AnalyzeParameters()
    analyzeResult = featureContent.analyze(itemId=itemId, analyzeParameters=analyzeParams)
    #  Published based off the analyze function
    #
    if 'publishParameters' in analyzeResult:
        pp = analyzeResult['publishParameters']
        publishParams = arcrest.manageorg.PublishCSVParameters(name=pp['name'],
                                               locationType=pp['locationType'],
                                               layerInfo=pp['layerInfo'],
                                               latitudeFieldName=pp["latitudeFieldName"],
                                               longitudeFieldName=pp['longitudeFieldName'])
        print usercontent.publishItem(fileType="csv",
                                      publishParameters=publishParams,
                                      itemId=itemId)
Let's discuss the above code. Here we access AGOL and add an item for our user. Once uploaded, the code, using the item id, analyzes the CSV to get a set of default publishing parameters. These parameters are used to populate the PublishCSVParameters class in order to publish the CSV file correctly.
Pretty cool. ArcREST masks a complex work flow into a couple of short lines of Python code.
Friday, May 8, 2015
ArcREST Basics - Creating a Group
Managing your portal or AGOL site can be a tough task, and ArcREST is here to help. Often within your organization, individuals need new groups or maybe you need to create a set of default groups. ArcREST allows individuals to create a list of group then put users into that group easily.

The Pointy Hair Boss (http://www.andrewlipson.com/)
So here is the situation. You boss wants you to create a group called 'Publishing Review'. This group will contain all your users must be in this group. The point of this group is that non-administrator accounts cannot publish to the public, and any data within this group will be reviewed by administrators on a given cycle and published if the information meets the organizations standards.
Let's begin!
import arcrest
#--------------------------------------------------------------------------
def getAllUsers(portalId, admin):
    """
       returns all the users for a given AGOL

       Inputs:
          portalId - unique id of the portal
          admin - manageorg.Administration object
       Output:
          returns a list of the users
    """
    start = 1
    num = 100
    portals = admin.portals(portalId=portalId)
    count = 0
    nextStart = 0
    results = []
    while nextStart > -1:
        users = portals.users(start=start + (num * count),
                              num=num)
        results = results + users['users']
        count += 1
        nextStart = users['nextStart']
        del users
    return results
#--------------------------------------------------------------------------
if __name__ == "__main__":
    #   Connect to the site
    #
    sh = arcrest.AGOLTokenSecurityHandler(username, password)
    admin = arcrest.manageorg.Administration(securityHandler=sh,
                                             initialize=True)
    community = admin.community
    portals = admin.portals()
    groups = community.groups
    portalId = portals.portalId
    #   Create Group
    #   Basic group inputs
    access = "org"
    groupTitle = "Pre Publishing Group"
    groupTags = "Publishing;Service Management"
    description = "This group allows users to request publishing services to public."
    # search to see if the group exists. If not, create the group, else use the ID
    searchResult = community.getGroupIDs(groupNames=groupTitle)
    if len(searchResult) == 0:
        groupId = community.createGroup(title=groupTitle,
                                tags=groupTags,
                                description=description,
                                snippet="",
                                phone="",
                                access=access,
                                sortField="title",
                                sortOrder="asc",
                                isViewOnly=False,
                                isInvitationOnly=False,
                                thumbnail=None)['group']['id']
    else:
        groupId = searchResult[0]
    # Get all the site's users and add them to the group
    users = [user['username'] for user in getAllUsers(portalId=portalId, admin=admin)]
    if len(users) > 0:
        groups.addUsersToGroups(users=",".join(users), groupID=groupId)
So let's review the code. First we connect to our site. Next we grab all the objects we will need to work with in order to make the magic happen. Since the topic is groups, there is a need to work with the community functions as well as some portal functions. This will give us all the access we need. After we do all of that, we need to know the group ID, this is found by either creating the group or if it exists, getting the site to return the information to us. Using the community object, call the getGroupIDs() returns the IDs for a group or groups as a list. If the list if < 1 then create the group using the createGroup() else use the search result Id to add the users.
To get all the users, I created a function that will go and grab all the users from the portal object. All you need to pass is the portalId and the administration objects and I detailed list of users will be returned. Since in this sample we only need username, we can just parse out what we need and move on as shown above.
Hope this have been a helpful post, keep on rocking, and post your questions/comments/enhancements on the ArcREST page: http://www.github.com/Esri/ArcREST
Tuesday, April 28, 2015
ArcREST Basics - ArcGIS Online and Query()
In this weeks ArcREST basics series, I am going to go into the how to connect to your organization on ArcGIS Online (AGOL) using Python, and perform some basic queries using the manageorg sub-package in ArcREST.
First we start by building off the previous lesson and create a security handler object for AGOL. If you missed a deeper discussion on how to handle security, please see this post.
One of the most common tasks to perform when working with your site, is to query it to see what content you have. There are two ways to query a site:
This returns a Python dictionary object as shown below:
Let us examine the results object. It's a dictionary with many valuable key/value pairs. Since this query was performed using the default values, this means that the query will begin with the first item and go to the 10th item (num). The key nextStart tells you where the start value needs to be if you want to page each result. So the next time you pass the query in order to get all the results you need to set the start = 11. Manually this seems quite daunting task, but luckily for us, we have looks. There are many way to create loops to perform this task, but in this example, a while loop will be used to walk the results and put them in a single list object.
AGOL has it's own query language much like the google or other search engines. This documentation can be found here (http://doc.arcgis.com/en/arcgis-online/reference/search.htm). It is a must read for anyone who wants to query AGOL or Portal effectively.
Though the samples shown are created to work with Portal, then same example can be used to query a Portal site.
If you want to learn more, please visit the ArcREST Github Page. Help us make it better and post comments, suggestions and improvements in the Issues section. Or better yet, fork the repo and submit a pull request.
Happy Coding and Enjoy!
First we start by building off the previous lesson and create a security handler object for AGOL. If you missed a deeper discussion on how to handle security, please see this post.
One of the most common tasks to perform when working with your site, is to query it to see what content you have. There are two ways to query a site:
- With Credentials - this means a token will be appended on the end of the query search, and users can find both public and non-public items if your users has the proper permissions to do so.
- Without Credentials - this means only find public items shared with everyone.
from arcrest.security import AGOLTokenSecurityHandler
from arcrest.manageorg import Administration
if __name__ == "__main__":
    username = "username"
    password = "password"
    proxy_port = None
    proxy_url = None
    securityHandler = AGOLTokenSecurityHandler(username, password,
                                               proxy_url=proxy_url,
                                               proxy_port=proxy_port)
    siteObject = Administration(securityHandler=securityHandler,
                                proxy_url=proxy_url,
                                proxy_port=proxy_port)
    results = siteObject.query(q="< some query string >")
This returns a Python dictionary object as shown below:
{
   "query" : "type:feature class",
   "total" : 12345,
   "start" : 1,
   "num" : 10,
   "nextStart" : 11,
   "results" : [ ...list of items... ]
}
Let us examine the results object. It's a dictionary with many valuable key/value pairs. Since this query was performed using the default values, this means that the query will begin with the first item and go to the 10th item (num). The key nextStart tells you where the start value needs to be if you want to page each result. So the next time you pass the query in order to get all the results you need to set the start = 11. Manually this seems quite daunting task, but luckily for us, we have looks. There are many way to create loops to perform this task, but in this example, a while loop will be used to walk the results and put them in a single list object.
def findContentByDate(admin, q):
    """
       finds items based on a query (q)

       Inputs:

          admin - manageorg.Administration object
          q - query string
    """
    start = 1
    count  = 0
    nextStart = 0
    num = 100
    results = []
    while nextStart != -1:
        query = admin.query(q=q,
                        sortOrder="desc",
                        sortField="modified",
                        t=None,
                        start=start + (count * num),
                        num=100)
        results = results + query['results']
        nextStart = query['nextStart']
        count += 1
    return results
Now we have all the items based on a query in a single Python list. This is very helpful in cataloging a site/org or even good for finding publicly shared items. AGOL has it's own query language much like the google or other search engines. This documentation can be found here (http://doc.arcgis.com/en/arcgis-online/reference/search.htm). It is a must read for anyone who wants to query AGOL or Portal effectively.
Though the samples shown are created to work with Portal, then same example can be used to query a Portal site.
If you want to learn more, please visit the ArcREST Github Page. Help us make it better and post comments, suggestions and improvements in the Issues section. Or better yet, fork the repo and submit a pull request.
Happy Coding and Enjoy!
Wednesday, April 22, 2015
ArcREST Basics - Authentication
When starting working with any new package, there is always a learning curve, and I am trying to make ArcREST easy and fun to use. So here is my first of many ArcREST posts on how to use this package to meet your Esri REST API use cases.
This post will focus on the most basic thing, authentication. Authentication is the most basic idea to understand when working with ArcGIS Online, ArcGIS Server, or ArcGIS Portal. It identifies who you are, and what you are allowed to do. Not all operations require authentication, but it's good to understand the token based security model and how it applies to you ArcGIS stack.
A quick blurb from the ArcGIS help describes what token security does:
It is lots of code just to gain access. As a user/developer you have not even begun to work on your actual workflow of what you need.
So there has to be an easier way?
Well there is! ArcREST supports three main forms of token based security in the form of classes.
2. Creating an ArcGIS Online Security Handler
3. Creating an ArcGIS for Portal Security Handler
In each example, it shows how to generate the token handlers. You then can pass the security handlers objects onto other functions like arcrest.manageorg.Administration(), which will allow administrators to perform operations to manage a portal or AGOL site.
Hope this helps!
Please download ArcREST here (http://www.github.com/Esri/ArcREST)
If you use ArcREST, help us out and post comments in the issues sections. We are always trying to make it better. If you think you can make it better, fork it and submit a pull request!
This post will focus on the most basic thing, authentication. Authentication is the most basic idea to understand when working with ArcGIS Online, ArcGIS Server, or ArcGIS Portal. It identifies who you are, and what you are allowed to do. Not all operations require authentication, but it's good to understand the token based security model and how it applies to you ArcGIS stack.
A quick blurb from the ArcGIS help describes what token security does:
ArcGIS Server provides a proprietary token-based authentication mechanism where users can authenticate themselves by providing a token instead of a user name and password. An ArcGIS token is a string of encrypted information that contains the user's name, the token expiration time, and some proprietary information. To obtain a token, a user provides a valid user name and password. ArcGIS Server verifies the supplied credentials and issues a token. The user presents this token whenever accessing a secured resource.Before ArcREST, I you probably had to write this function out a lot:
import urllib
import urllib2
import httplib
import time
import json
import contextlib

def submit_request(request):
    """ Returns the response from an HTTP request in json format."""
    with contextlib.closing(urllib2.urlopen(request)) as response:
        job_info = json.load(response)
        return job_info

def get_token(portal_url, username, password):
    """ Returns an authentication token for use in ArcGIS Online."""

    # Set the username and password parameters before
    #  getting the token.
    #
    params = {"username": username,
              "password": password,
              "referer": "http://www.arcgis.com",
              "f": "json"}

    token_url = "{}/generateToken".format(portal_url)
    request = urllib2.Request(token_url, urllib.urlencode(params))
    token_response = submit_request(request)
    if "token" in token_response:
        print("Getting token...")
        token = token_response.get("token")
        return token
    else:
        # Request for token must be made through HTTPS.
        #
        if "error" in token_response:
            error_mess = token_response.get("error", {}).get("message")
            if "This request needs to be made over https." in error_mess:
                token_url = token_url.replace("http://", "https://")
                token = get_token(token_url, username, password)
                return token
            else:
                raise Exception("Portal error: {} ".format(error_mess))
It is lots of code just to gain access. As a user/developer you have not even begun to work on your actual workflow of what you need.
So there has to be an easier way?
Well there is! ArcREST supports three main forms of token based security in the form of classes.
- PortalTokenSecurityHandler - this allows access to ArcGIS Portal Site
- AGOLTokenSecurityHandler - this generates a token for ArcGIS Online
- AGSTokenSecurityHandler - this generates a token for ArcGIS Server Sites
Why should I use this?
- allows for cleaner code
- pass username/password once in your code
- built in proxy support
- handles token expiration automatically
#3 is a biggie, at least in my eyes. For long running tasks, there is a chance, depending on your expiration time, that your token might fail you because it is too old. The SecurityHandler classes automatically handle the expiration for you, and regenerate new tokens as needed.
Examples of creating Securityhandler objects:
1. Creating an ArcGIS Server Security Handler
import arcrest
if __name__ == "__main__":
    token_url = "http://mysite.com:6080/arcgis/admin/generateToken"
    username = "username"
    password = "password"
    sh = arcrest.AGSTokenSecurityHandler(username=username,
                                         password=password,
                                         token_url=token_url)
2. Creating an ArcGIS Online Security Handler
import arcrest
if __name__ == "__main__":
    username = "< username >"
    pw = "< password >"
    proxy_url = None
    proxy_port = None
    sh = arcrest.AGOLTokenSecurityHandler(username, password=pw)
3. Creating an ArcGIS for Portal Security Handler
import arcrest
if __name__ == "__main__":
    username = "< username >"
    pw = "< password >"
    tokenUrl = "https://mysite.com/portal/sharing/rest/generateToken"
    org_url = "https://mysite.com/portal/sharing/rest"
    sh = arcrest.PortalTokenSecurityHandler(username=username,
                                            password=pw,
                                            org_url=org_url,
                                            token_url=tokenUrl)
In each example, it shows how to generate the token handlers. You then can pass the security handlers objects onto other functions like arcrest.manageorg.Administration(), which will allow administrators to perform operations to manage a portal or AGOL site.
Hope this helps!
Please download ArcREST here (http://www.github.com/Esri/ArcREST)
If you use ArcREST, help us out and post comments in the issues sections. We are always trying to make it better. If you think you can make it better, fork it and submit a pull request!
Monday, April 13, 2015
ArcREST Update - update your forks!
Today I pushed into the master git repository an update that allows users who use Requests to have ArcREST default to that. If requests if not present, never fear, the library falls back to the standard urllib modules in the basic python install.
Enjoy!
Wednesday, April 8, 2015
ArcREST - Bigger and Better
I've been working hard on ArcREST (https://github.com/esri/arcrest) these days, and the package is catching on I think. Over the last couple of months, ArcREST has been shown at both Esri's Federal Developer Summit and at the Esri Developer Summit in California. I truly think the effort is beginning to pay off, and users are reaping the hard work put into this package.
Simply put, this is a toolbox to manage, manipulate, and control your online GIS presence. Portal, ArcGIS Server, and ArcGIS Online can now be controlled through Python! The modules present in the Python package are like hammers, nails, and screw drivers. They provide the framework to do greater things. By themselves, they do not seem like much, but together you can build your GIS house through the common scripting language of the science community.
I am constantly looking for feedback on this package, so sign up on github, and test it out with a work flow you need in these environments. If you find a bug, have a question, or need help, please post it in the issue area of github.
Thank you everyone!
Wednesday, March 4, 2015
Better Workflows in ArcREST
ArcREST is a project I started, and continue to work on. It is currently on version 2.x and is evolving daily. The primary focus from the administration side of things, it to make life easier to manage object without knowing all the ins and outs or URLs for every server that relates to ArcGIS Online Site or an internal portal.
Starting today, the package will include a property that will allow users to directly access the site's hosting servers in either the federated environment or on ArcGIS Online. To access this, you must be an administrator user of your site. You create the manageorg.Administration object, and then you can navigate around your whole system. This object has a new function called hostingServer(). It has an optional parameter called portalId which represents the organizational identifier. If the user does not know it, a None can be passed and the package will try and discover the id.
The results are as follows:
- If the site is ArcGIS Online, a list of hostedservice.service.Services objects is returned
- If the site is Portal, a list of AGSAdministration objects is returned
Lets look at some sample code:
 import arcrest
if __name__ == "__main__":
    username = "A USERNAME"
    pw = "PASSWORD"
    adminUrl = "https:///portal/sharing/rest
    tokenUrl = "https:///portal/sharing/rest/generateToken"
    sh = arcrest.PortalTokenSecurityHandler(username=username, password=pw,
                                            org_url=adminUrl,
                                            token_url=tokenUrl)
    print sh.token
    admin = arcrest.manageorg.Administration(url=adminUrl,
                                             securityHandler=sh)
    servers = admin.hostingServers()
    for s in servers:
        if isinstance(s, arcrest.manageags.AGSAdministration):
            print s.info.fullVersion
            print s.resources
        elif isinstance(s, arcrest.hostedservice.Services):
            print s.currentVersion
Depending on what information you provide for the manageorg.Adminstration function, you will get back different object. If you pass in a AGOLTokenHandler, and connect to AGOL, you will get back one object, and if you pass a Portal reference, you will get back the federated and hosted server information.
This is an effort to make managing AGOL and Portal sites easier for administrators. I hope this helps everyone out there!
This is an effort to make managing AGOL and Portal sites easier for administrators. I hope this helps everyone out there!
Enjoy,
A
Tuesday, February 17, 2015
So What's Not in ArcGIS Pro 1.0 for ArcPy?
Not every tool is in ArcPy at Pro 1.0. If you are porting tools, it is important to remember this. A complete list of tools not in ArcGIS Pro 1.0 can be found here (http://pro.arcgis.com/en/pro-app/tool-reference/appendices/unavailable-tools.htm).
Lots of functions are missing, but that doesn't mean you shouldn't try out Pro. It's a wonderfully fun product, and the 3D really makes your data pop out. I also feel that the function layouts are more intuitive, so it's easy to get started.
Moving from the 2.x framework of Python can also be daunting as well. There is a tool for analyzing your scripts, toolboxes and/or models in Pro found here. (http://pro.arcgis.com/en/pro-app/tool-reference/data-management/analyzetoolsforpro.htm)
You'll get back a nifty little report telling you what will not work. It's very helpful in trying to find where the fails will occur.
Check them out and happy coding!
Thursday, February 12, 2015
Check out ago-assistant
Ever want to get into the nuts and bolts of AGOL or Portal and see the JSON behind the scenes? Well check out ago-assistant.
This application was developed by a follow co-worker, and it's awesome! It's a nice GUI based application that gives you fine grained access to your site's information.
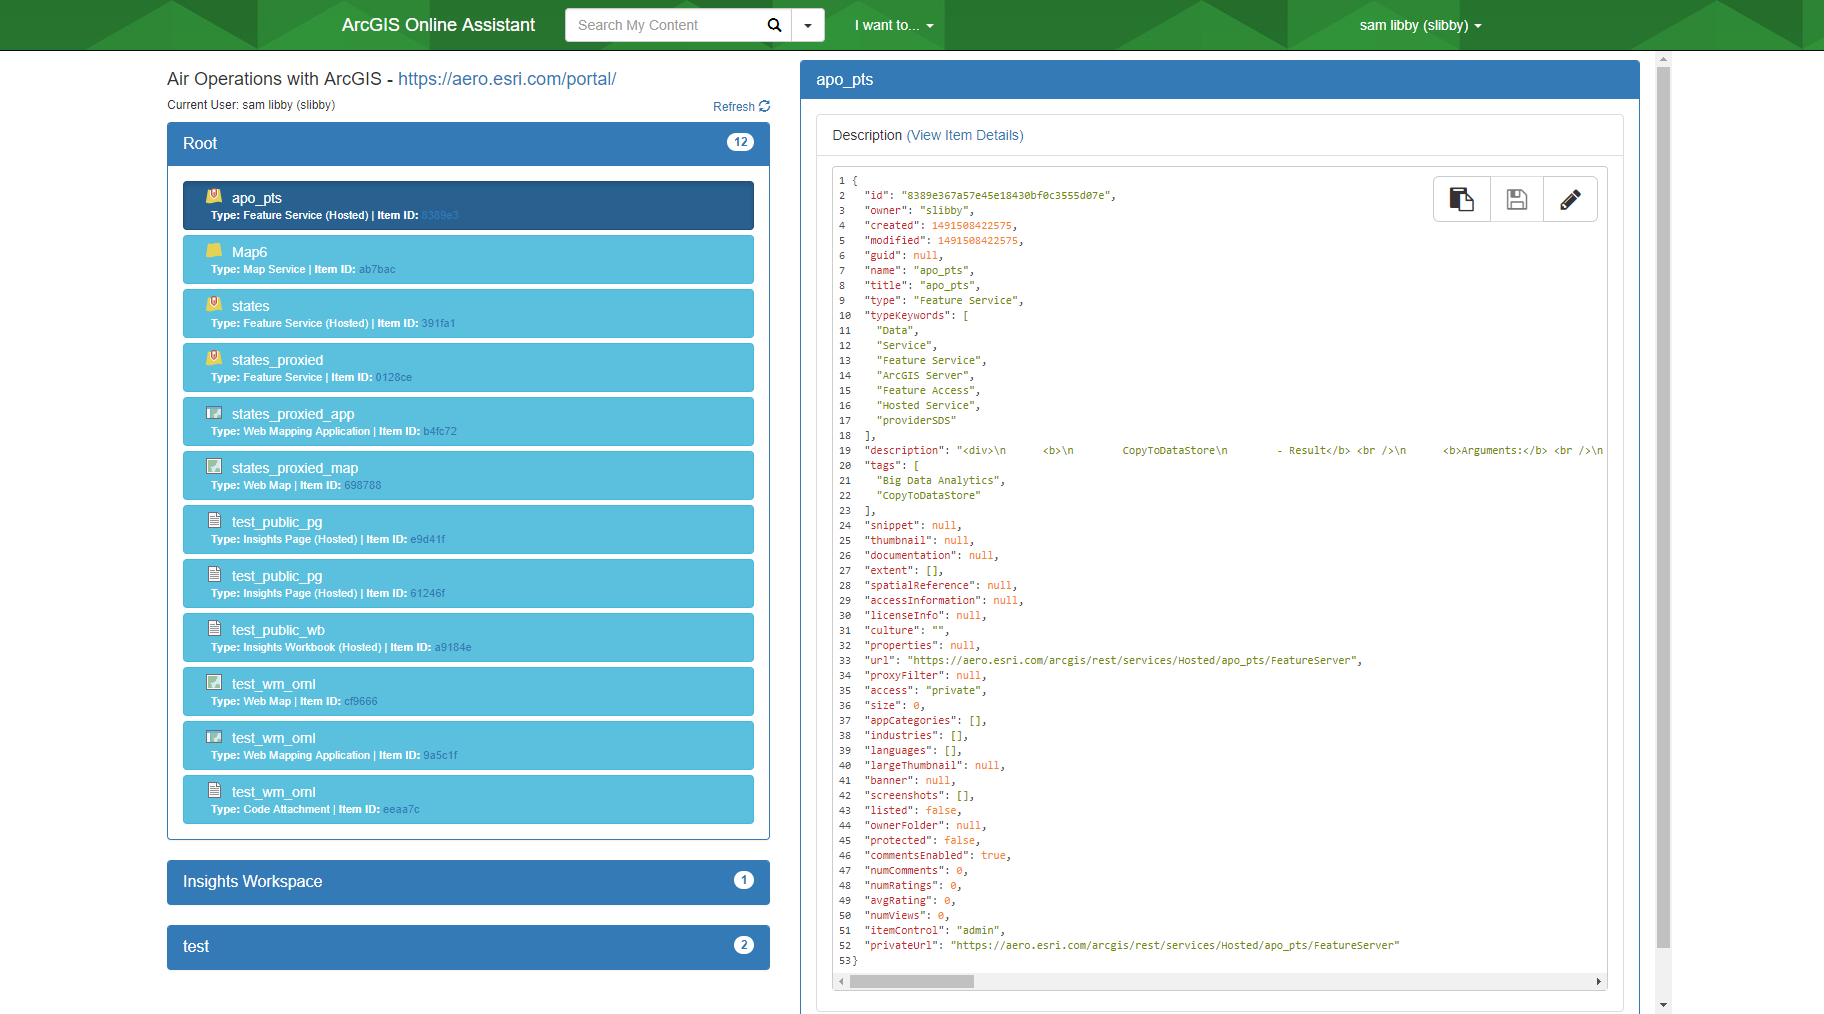
I find this tool coupled with fiddler can help you easily debug your applications, or better help you understand the ArcGIS REST API that performs the magic.
You can grab it from github here: https://github.com/Esri/ago-assistant
Enjoy and check it out.
A
This application was developed by a follow co-worker, and it's awesome! It's a nice GUI based application that gives you fine grained access to your site's information.
I find this tool coupled with fiddler can help you easily debug your applications, or better help you understand the ArcGIS REST API that performs the magic.
You can grab it from github here: https://github.com/Esri/ago-assistant
Enjoy and check it out.
A
Friday, January 9, 2015
Convert Runtime Database to File Geodatabase
New at 10.3, you can convert a runtime database to a file geodatabase. The tool copies the contents of a runtime geodatabase into a new file geodatabase including the table names, etc... It's very simple to use:
Here we copied a .geodatabase file (runtime database) to a file geodatabase. Now the data captured in the runtime db can be used in desktop or anything else that can't directly access runtime libraries.
Enjoy
import arcpy
arcpy.CopyRuntimeGdbToFileGdb_conversion(r"D:\data\RuntimeGDBs\delta.geodatabase",
                                         'D:\data\copiedGDBs\deltaFGDB.gdb')
Here we copied a .geodatabase file (runtime database) to a file geodatabase. Now the data captured in the runtime db can be used in desktop or anything else that can't directly access runtime libraries.
Enjoy
Subscribe to:
Posts (Atom)