Monday, December 19, 2011

Exit that Script, and exit it now!

Help, I need to kill my script!  Use the sys.exit() gives me an error!!  What to do?

Use the try/except method to just move beyond those errors my friend.  Very simple.


import arcpy
from arcpy import env
import sys
value = arcpy.GetParameterAsText(0)
try:
    arcpy.AddMessage(value)
    arcpy.AddMessage("VERY INTERESTING VALUE....")
    arcpy.AddMessage("FORCED EXIT")
    sys.exit(0)
except SystemExit:
    arcpy.AddMessage("WHEN I EXIT I GO HERE: SystemExit exception")
    pass
except:
    arcpy.AddError("ERROR ERROR" )
    arcpy.AddError(arcpy.GetMessages(2))


Enjoy!

*You can also use:
import os
os_exit(0)
I haven't tested this though.

Saturday, December 17, 2011

Displaying Messages for a Specific Tool

Robust messaging is very important to help developers debug issues and it helps end users understand what the tool is doing.

ArcGIS Desktop geoprocessing tools have robust messaging built in, but when you run a script, those messages get lost.  To access individual tool messages, just do the following:


import arcpy
from arcpy import env
import sys
env.overwriteOutput = True
sr = arcpy.SpatialReference()
sr.factoryCode = 4326
sr.create()
pt = arcpy.Point(-78,38)
pointGeom = arcpy.PointGeometry(pt,sr)
copiedPt = arcpy.CopyFeatures_management(pointGeom)
print copiedPt.getMessages()


This produces:


Executing: CopyFeatures in_memory\f331817DB_DC61_4523_88F8_1B0329E5F568 c:\TEMP\copiedPT.shp # 0 0 0
Start Time: Fri Dec 16 13:10:14 2011
Succeeded at Fri Dec 16 13:10:14 2011 (Elapsed Time: 0.00 seconds


Very cool and enjoy

Friday, December 16, 2011

Support HTML Tages in Page Layout

Please support the idea of allowing HTML tags in labels:

http://ideas.arcgis.com/ideaView?id=08730000000bsT8AAI

Thanks

Tuesday, December 13, 2011

Population and Water Tackled on NPR's Talk of the Nation

An interesting segment was played on Talk of the Nation yesterday about population growth, water, and food.  As a geographer and someone who is interested in have a sustainable environment, I feel it's worth taking a look at: http://www.npr.org/2011/12/12/143587133/as-global-population-grows-water-matters-more

Enjoy

Monday, December 5, 2011

Fitting Text in Page Elements Based on Sentence Length

When working with Page Layout and Map Automation, sometimes you want to let the user pass some random text into a text element, but you need to format the text so it doesn't look like one big line of mush.

For this example assume you have a page layout and the maximum length a text item can be is 90 characters.  To format this correctly, you need to check if the values provided are less than 90 characters, if it is, write it, if not, start a new line.

sentence = "No one has posted to this discussion for at least three months. Please let old threads die and do not reply to them unless you feel you have something new and valuable to contribute that absolutely must be added to make the discussion complete. Otherwise please start a new thread in this forum instead."
lineLength = 90
count = 0
currentLine =""
lines = []
for word in str(sentence).split(" "):
    wordLength = len(word + " ")
    if (count + 1) < lineLength:
        currentLine = currentLine + word + " "
    else:
        lines.append(currentLine.strip() + "\n")
        currentLine = word + " "
        count = 0
    count += wordLength
lines.append(currentLine.strip() + "\n") 


So I took some test from a random forums I was reading and used that as my dummy text.  At the end of each sentence when I reach the 90 character limit or when the next word will push the line over the 90 character limit, I add a '\n' which will signal for a newline.
Now, put the text in a text element:


mxd = arcpy.mapping.MapDocument("CURRENT")
elem = arcpy.mapping.ListLayoutElements(mxd,"TEXT_ELEMENT","txtTestLength")[0]
elem.text = ""
for line in lines:
    elem.text += line
arcpy.RefreshActiveView()

The arcpy.RefreshActiveView() is essential to use in order to see the new text.  If there is a better way, post it in the comments.

Enjoy and Happy Mapping!

Wednesday, November 30, 2011

Convert Decimal Degree to Degrees Minutes Seconds Using Python

Here is a function that will convert decimal degree values to degrees, minutes, and seconds.  It's nice to show DMS notation as labels for points at times, so here is a script I made to do this:


def decimalDegrees2DMS(value,type):
    """
        Converts a Decimal Degree Value into
        Degrees Minute Seconds Notation.
        
        Pass value as double
        type = {Latitude or Longitude} as string
        
        returns a string as D:M:S:Direction
        created by: anothergisblog.blogspot.com 
    """
    degrees = int(value)
    submin = abs( (value - int(value) ) * 60)
    minutes = int(submin)
    subseconds = abs((submin-int(submin)) * 60)
    direction = ""
    if type == "Longitude":
        if degrees < 0:
            direction = "W"
        elif degrees > 0:
            direction = "E"
        else:
            direction = ""
    elif type == "Latitude":
        if degrees < 0:
            direction = "S"
        elif degrees > 0:
            direction = "N"
        else:
            direction = "" 
    notation = str(degrees) + ":" + str(minutes) + ":" +\
               str(subseconds)[0:5] + "" + direction
    return notation


It's a very simple function, but very useful.  Feel free to use it, but give my blog some love and cite me.
Enjoy

Friday, November 25, 2011

Get Selected Layer From TOC (ArcObjects)

Getting the selected layer a user is using can be an easy way to have the user interact with ArcMap without having them mull through some form.  This is be achieved in a couple of line of code:

IContentsView contentsView = mapDocument.CurrentContentsView;
object selectedItem = contentsView.SelectedItem;
if (!(selectedItem is ILayer))
{
   return;
}


First the code assumes you know how to get the current map document's reference and second it not only gets the selected item, I provided a simple check that ensures it's a layer object.

Enjoy

Wednesday, November 23, 2011

Clearing a selection from select by location

After performing a select layer by location function, sometimes you need to clear it, but the select by location function does not have a "CLEAR" option, so what to do?..?  Well no fear, you can use the following:


arcpy.SelectLayerByAttribute_management(layer, "CLEAR_SELECTION")

and magically your rows will no longer be selected.

Enjoy

Tuesday, November 22, 2011

Boxplots using matplotlib

If you ever need to graph anything using python, I recommend matplotlib. Here is an example of a boxplot below. The link will take you to the help documentation in matplotlib. It's pretty good compared to many other python modules.


from pylab import *

# fake up some data
spread= rand(50) * 100
center = ones(25) * 50
flier_high = rand(10) * 100 + 100
flier_low = rand(10) * -100
data =concatenate((spread, center, flier_high, flier_low), 0)

# basic plot
boxplot(data)
#savefig('box1')

# notched plot
figure()
boxplot(data,1)
#savefig('box2')

# change outlier point symbols
figure()
boxplot(data,0,'gD')
#savefig('box3')

# don't show outlier points
figure()
boxplot(data,0,'')
#savefig('box4')

# horizontal boxes
figure()
boxplot(data,0,'rs',0)
#savefig('box5')

# change whisker length
figure()
boxplot(data,0,'rs',0,0.75)
#savefig('box6')

# fake up some more data
spread= rand(50) * 100
center = ones(25) * 40
flier_high = rand(10) * 100 + 100
flier_low = rand(10) * -100
d2 = concatenate( (spread, center, flier_high, flier_low), 0 )
data.shape = (-1, 1)
d2.shape = (-1, 1)
#data = concatenate( (data, d2), 1 )
# Making a 2-D array only works if all the columns are the
# same length. If they are not, then use a list instead.
# This is actually more efficient because boxplot converts
# a 2-D array into a list of vectors internally anyway.
data = [data, d2, d2[::2,0]]
# multiple box plots on one figure
figure()
boxplot(data)
#savefig('box7')

show()


This will produce the following:
Pretty sweet.  Maybe you could use this to graph the elevation profile?  (Hint: you can)

Enjoy

Friday, November 18, 2011

Getting the Extent is Easy as Describe() - ArcPy

Early in my blog, I posted methods on obtaining the extent, and creating an extent polygon using the Array and Poylgon objects.  Here is the short cut for creating extent polygons for a whole feature class:

import arcpy
dataset = r"c:\temp\myfeatures.shp"
desc = arcpy.Describe(dataset)
extent = desc.extent
arcpy.CopyFeatures_management(extent, "c:/TEMP/extent.shp")

Very cool, and very easy.

High Resolution Moon Maps

NASA's Lunar Reconnaissance Orbiter has completed it's mission of taking high resolution images of the moon, and now you can take advantage of them as well.  According to NASA over 69K worth of photos were geo-referenced and stitched together to create raster imagery with a cell size of 328 ft by 328 ft.  They note that the polar coverage is limited due to the lack of light the moon receives there and a different orbiter is mapping the poles using lasers.

You can get the imagery here: http://wms.lroc.asu.edu/lroc

Happy Space

Wednesday, November 16, 2011

Using Sqlite3 to store Blob data

Sqlite3 is the python module that creates a self contained, server less, zero-configuration, and transactional SQL database.  SQLite is an embedded SQL database engine. Unlike most other SQL databases, SQLite does not have a separate server process. SQLite reads and writes directly to ordinary disk files. A complete SQL database with multiple tables, indices, triggers, and views, is contained in a single disk file. The database file format is cross-platform - you can freely copy a database between 32-bit and 64-bit systems.  More can be found out about the database here
In python, you can quickly access or create a SQLite database by using the Sqlite3 module as mentioned above:

db_filename = r"C:\TEMP\sqllist\myDB.db"
db_is_new = not os.path.exists(db_filename)
conn = sqlite3.connect(db_filename)
cursor = conn.cursor()
if db_is_new:
    print 'Need to create schema'
    tableCreation = """create table data (
                    id integer primary key autoincrement not null,
                    File blob,
                    Type text,
                    FileName text);"""
    conn.execute(tableCreation)
else:
    print 'Database exists, assume schema does, too.'

Let's assume we want to store a zip file inside the database.  To do this, open the reference to the file and save it as binary data.  The data will be stored in the field called 'File' as created above.

zipFile = r"C:\TEMP\sqllist\extent.zip"

with open(zipFile, "rb") as input_file:
    ablob = input_file.read()
    cursor.execute("INSERT INTO data (File,Type,FileName) VALUES(?,'zip','" + zipFile + "')", [sqlite3.Binary(ablob)])
    conn.commit()

Here we open the zip file and using an INSERT command put the data into the data table.
Next, perform a simple SELECT statement to show that the row exists in the table:

cursor.execute("select * from data")
for row in cursor:
    print row
del row

This will yield something like this:

>>> (1, , u'zip', u'C:\\TEMP\\sqllist\\extent.zip')

To get the Blob data out of the database, use the SELECT SQL statement and the open() to create a new zip file:

with open(r"c:\temp\sqllist\Output.zip", "wb") as output_file:
    cursor.execute("SELECT file FROM data WHERE id = 1")
    ablob = cursor.fetchone()
    output_file.write(ablob[0])
    cursor.close()
conn.close()

The code above creates a new file called 'output.zip' and writes the information from the blob field to the file. Then the script closes the database connection and cursor connection.

Easy as Π

Friday, November 11, 2011

Speak Up For Geography

Support Geography!  Go to here: http://speakupforgeography.rallycongress.com/

Write your congressional leadership and let them know you want them to support the "Geography is Fundamental (TGIF) Act". Please do it by November 18, 2011.

Join the cause and help students improve their geography knowledge.

Thanks everyone!

Monday, November 7, 2011

Vote November 8th - General Elections (USA)

Please remember to vote this year (and every year).  Elections have consequences, especially if you do not make your voice heard. If you don't vote you might get something you really don't want.

Friday, November 4, 2011

Parallel Python with GIS

I've begun to dive into Parallel Python to see if I can reduce processing times on long running tasks by dividing the workload among a cluster of computers. 

I've already run into some problems:
  • Spatial data is not serializable
  • Lack of good documentation from Parallel Python
  • No upload data/download results function if you use files.
  • Servers time out
  • Tasks randomly restart
You'll have to have arcpy installed on all the machines you are performing the cluster computing with.
Now that you know that, you can get started easy as this:

ppservers = ('xx.xxx.xx.xx:8080',)
job_server = pp.Server(ppservers=ppservers,ncpus=0)

You set ncpus = 0 inorder prevent processes from being used locally. To submit a job:

libs = ("arcpy",)

job_server.submit(function,# function to perform
                 (variables,), # function variable
                 (),# call back function
                 libs # modules used by function
)
job_server.wait() # waits for the job to complete
job_server.print_stats() # print some stats about the server and task
del job_server


It's that simple to run the task.

Enjoy

Thursday, November 3, 2011

Vote for HTML Tag Support in Page Layouts

Please vote for my idea on the ArcGIS Idea Page. 

Thanks
~A

pyshp - the big update

Over at GeospatialPython.com, there is an interesting blog post here that talks about .shx files as they relate to the whole shapefile make up (shp,dbf,shx,etc..) and why they are important or unimportant.  pyshp now supports the creation of .shx files to provide the complete shapefile spec. 

I think that is great, and I'm glad the community has taken to the open shapefile specification so well, but I think it's time we all move onto the file geodatabase.  You can find the API here.  As of right now, there is no python module to handle the file geodatabase spec, but I'm sure one will float up soon.

Wednesday, October 26, 2011

Working with Date Field (simple example)

Say you want to update a date field on a file geodatabase and it is in the format of: "Tue, 25 Oct 2011 18:44:39 +0000".  To insert this date, you need to convert it using the datetime module and provide the correct date format:
import datetime
def convertTime(timestring,format):
    return datetime.datetime.strptime(timestring, format)

where the format in this case would be "%a, %d %b %Y %H:%M:%S +0000".  You can then take the datetime object and insert the value into the date field.

You can find more on formatting times here in section 8.1.7.

Enjoy

Friday, October 14, 2011

SP3 for ArcGIS 10 is Here

SP3 is out, go download it here: http://resources.arcgis.com/content/patches-and-service-packs

Turn off Minimize and Maximize Transitions on Windows 7

Transition animation annoys me when windows are maximized and minimized.

To disable this do the following:

  1. Right click on My Computer
  2. Select Properties
  3. Select Advanced System Settings
  4. Click the Advanced Tab 
  5. Under performance click Settings
  6. Uncheck 'Animate windows when minimizing and maximizing'
  7. Press OK -> apply -OK
That's it!
 Enjoy

Wednesday, September 28, 2011

Turning on labels through ArcPy

The Layer object in the ArcPy module allows python developers to turn on labels of a feature class on and off at run time.  This is especially helpful if you are exporting maps and you want to control what Layers are labeled.
Example: Turning on Labels
import arcpy
from arcpy import mapping
fc = r"c:\temp\fc.shp"
tempLayer = "tempLayer"
arcpy.MakeFeatureLayer_management(fc, tempLayer)
#   Make the Layer Object
#
layer = mapping.Layer(tempLayer)
layer.showLabels = True
#   Show the changes in ArcMap
#
arcpy.RefreshActiveView()
del layer 


Enjoy

Tuesday, September 27, 2011

Usage() - Arcpy

Usage() is a helpful tool that will return the syntax for a specific tool.  It's a great thing to use in IDLE when writing a python script and you forget what variables go where.

Example:
>>> import arcpy
>>> print arcpy.Usage("Buffer_analysis")
Buffer_analysis(in_features, out_feature_class, buffer_distance_or_field, {FULL | LEFT | RIGHT | OUTSIDE_ONLY}, {ROUND | FLAT}, {NONE | ALL | LIST}, {dissolve_field;dissolve_field...})
Buffer Features
>>> print arcpy.Usage("MakeFeatureLayer_management")
MakeFeatureLayer_management(in_features, out_layer, {where_clause}, {workspace}, {field_info}) Create a Feature Layer

Pretty help for those who don't have to refer to the help document all the time.
Enjoy!

Monday, September 19, 2011

A Quick Note on Multiprocessing

If you create a multiprocessing script and you want to use the python script in ArcToolbox, ensure the following settings are set on your script:
1. Show command window when executing is unchecked
2. Run python script in process is unchecked

Your python script should now multi-process if you wrote it correctly.

Enjoy


Tuesday, September 6, 2011

Finding Disk Size

Ever need to know how much space is left on a disk drive, well I did when creating map books for large areas. import os 
import platform
import ctypes 
def get_free_space(folder):
   """ Return folder/drive free space (in bytes) """ 
   if platform.system() == 'Windows': 
      free_bytes = ctypes.c_ulonglong(0)
      ctypes.windll.kernel32.GetDiskFreeSpaceExW(ctypes.c_wchar_p(folder), None, None, ctypes.pointer(free_bytes)) return free_bytes.value 
   else: 
      return os.statvfs(folder).f_bfree 
if __name__ == "__main__":
   path = (r"network drive") 
   print get_free_space(path) 

This prints the free space as bytes. It is cross platform and will work on both Linux,MaxOS and Windows. Enjoy

Wednesday, August 24, 2011

Sorting Dictionary Values

Let's say you want to find the largest feature in your feature class.  There are many ways to do this, but here is one simple way using dictionaries.


rows = arcpy.SearchCursor(infc)
featDict = {}
for row in rows:
   feat = row.getValue(shapefieldname)
   featDict[row.getValue("ObjectID")] = feat.area
del row, rows
for w in sorted(featDict,key=featDict.get,reverse=True):
   print w, featDict[w] # prints the largest area first and gives the OID value to get the feature
del featDict


The first entry in the dictionary will be the highest shape area. If you wanted the smallest area, you would set reverse=False.

The key here is the sorted(), which more information can be found here.

Tuesday, August 23, 2011

Ignoring Errors, Sometimes You Need To...

Say you need to write a multiprocessing script to perform a long running process and it's going to run on Windows XP or 7.  Sometime it can throw random IO errors, like data does not exists with ArcPy functions.

To compensate for that, you can embed try/except statements to ignore specific errors within your program.

For example:

try:
    try:
        fsock = open(r"c:\temp\test2.sde", "r")
    except IOError:
        pass
    print 'its all good'
except:
    print 'OH NO SOME ERROR HAS HAPPENED!'
finally:
    print 'see no errors, my script is awesome!'


The code will just ignore and IOErrors that occur during that section of code. I do not recommend using this all the time, but there are times were odd OS issues can prevent a multiprocessing task from completing correctly, at least in my experience.

Enjoy

Friday, August 19, 2011

Note on DataDrivenPages (Arcpy) Object

The property pageRow in the DataDrivenPages object for Arcpy states that it is read/write object, but it is only read only.  This mean if you need to update a record on your reference grid, you have to use an update cursor.

Thursday, August 18, 2011

Tips for Map Book Automation

The mapping module for Arcpy is awesome!  I can't wait to see what happens at 10.1.  Everything should be automated, and here is some tips that might help everyone develop map books a little better:
  1. Manage unneeded objects, delete them from memory if they are not needed anymore using the del statement.  (you can always extend some object to use using statements as well)
  2. If the area of interest is large and the grid area is small, it's going to take a long time to complete.  Get a cup of coffee!
  3. Eliminate the need to reference multiple Map Documents.  If you need a left and right page, use one Map Document and turn the layers on/off as needed.
  4. Use cached local map services if possible for basemap data.  This should speed production up.
  5. Modules like shutil.copy() can be quicker than some arcpy functions, so use them.
  6. Always check to see if the PDF file name exists (os.path.isfile()) and use arcpy.CreateUniqueName() frequently
  7. If the map book is going to be large (2000+ pages), consider splitting the book into multiple books
  8. Subprocessing module can be your friend and enemy, use it wisely or it will destroy you.
  9. Reference local data, not data over the network when possible
Now go automate your map production!

Please add your comments/tips to improve map automation, I'd love see what you have encountered.

Monday, August 8, 2011

Great post on Arcpy

If you want a standard template for working with python, Esri provided a great blog post on just that!

http://blogs.esri.com/Dev/blogs/geoprocessing/archive/2011/08/04/PythonTemplate.aspx

I recommend you use it to make life easier.


Wednesday, July 27, 2011

Select the correct geographic (datum) transformation when projecting between datums

I recently had to change lots of data from one datum to another, and I found this help article from Esri very useful:  http://support.esri.com/en/knowledgebase/techarticles/detail/21327

Happy Projecting!

Monday, July 25, 2011

Printing Using Arcpy.mapping

The ArcGIS Server Blog has a great article covering gp printing from server.  I highly recommend that anyone who wants to export maps to PDFs or automate printing go to this site: http://blogs.esri.com/Dev/blogs/arcgisserver/archive/2011/04/12/An-introduction-to-arcpy.mapping-for-ArcGIS-Server-developers.aspx

Enjoy

Thursday, July 21, 2011

2011 UC Geoprocessing Presentation

Did you miss the 2011 Esri User Conference, but you wanted to see the geoprocessing/python presentation?

Check out this link: http://resources.arcgis.com/content/geoprocessing/10.0/presentations

Enjoy

Wednesday, July 20, 2011

Extract Package

Extracts the contents of a layer or map package to a specified folder. The contents of the output folder is updated with the contents of the input package.


Example: Extract a Layer Package

import arcpy
import os
package = arcpy.GetParameterAsText(0)
destinationFolder = arcpy.GetParameterAsText(1)

extracted = destinationFolder + os.sep + 'unpackedLayers'

arcpy.ExtractPackage_management(package, extracted)

arcpy.SetParameterAsText(2,extracted)

Tuesday, July 19, 2011

Create a Layer Package

The layer package allows users to consolidate all your data resources into a single folder or compressed file.  The tools help users organize data that can be spread across the network.  The layer package also allows users to Share data by making it easy to publish the package to ArcGIS.com. 


Some interesting notes:

  • Layer packages are backwards compatible with ArcGIS 9.3.1.

  • A warning is issued when this tool encounters an unsupported layer type (a schematics or tool layer).

  • For layers that contain a join or participate in a relationship class, all joined or related data sources will be consolidated into the output folder.
  • The Schema Only parameter, if checked, will only consolidate the schema of the input data source(s).


Example of Consolidating all Layers:

import arcpy
import os

env.workspace = r"c:\temp"
listLayers = arcpy.ListFiles("*.lyr")
arcpy.PackageLayer_management(listLayers, 'packagelayers.lpk', "PRESERVE", "CONVERT_ARCSDE", "#", "ALL", "ALL", "CURRENT")

Monday, July 18, 2011

Testing for Schema Locks

TestingSchemaLock tests if a feature class or table has a schema lock.  Any tool that alters schema will require a schema lock to be placed on the input data.  If a tool requires a schema lock and is unable to acquire one an error message is provided.


import arcpy
data = arcpy.GetParameterAsText(0)
isLocked = arcpy.TextSchemaLock(data)
if lockTest:
   arcpy.AddField_management(data,"Flag","long")
else:
   print "Unable to acquire the necessary schema lock to add the new field"

Thursday, July 14, 2011

Removing Illegal Characters and Preventing Unicode Errors

I hate unicode errors like the one below, and I kept getting them intermediately on a table I was writing some scripts against.  Here is an example of an error I received:
UnicodeEncodeError: 'ascii' codec can't encode characters in position 1-4:
ordinal not in range(128)


After much internal debate, I decided to just remove the illegal characters when exporting or reading values in that table.  First I check to see if the value returned is a unicode type, then I apply my operation.

userValue = row.getValue(field)
if type(userValue) is unicode:
   val = ''.join([x for x in userValue if ord(x) < 128]) 

   # do something with val #
Now, the illegal characters are gone!

Here is a simpler example using IDLE:

>>> userValue = "abcdéf"
>>> val = ''.join([x for x in userValue if ord(x) < 128])
>>> print val
abcdf

Notice that the function just removed the Ă© value and produced 'abcdf'.

Hope this helps!

Wednesday, July 13, 2011

Creating Extent Polygons Using ArcPy

Awhile ago I wrote an article about creating extent polygons using the old arcgisscripting geoprocessing framework at version 931.  I've decided to update the posting because ArcPy makes it easy because you can easily get the extent object of a geometry and directly grab the extent point objects from the extent object.

To create an extent of the whole dataset use the describe method:

import arcpy
from arcpy import env
import os

inFC = r"c:\temp\USA.gdb\States"
extentPoly = str(env.scratchWorkspace) + os.sep + "extent.shp"
# Feature extent
#
extent = arcpy.Describe(inFC).extent
# Array to hold points
#
array = arcpy.Array()
# Create the bounding box
array.add(extent.lowerLeft)
array.add(extent.lowerRight)
array.add(extent.upperRight)
array.add(extent.upperLeft)
# ensure the polygon is closed
array.add(extent.lowerLeft)
# Create the polygon object
polygon = arcpy.Polygon(array)
array.removeAll()
# save to disk
arcpy.CopyFeatures_management(polygon, extentPoly)
del polygon

That should create a box around all your data in a feature class. Very simple!

Next, let's say you need the bounding box for each feature. In the example, I will continue with using a states polygon:

import arcpy
from arcpy import env
import os


env.overwriteOutput = True

inFC = r"c:\temp\USA.gdb\States"
extentPoly = str(env.scratchWorkspace) + os.sep + "extent.shp"
ptList = []
rows = arcpy.SearchCursor(inFC)

for row in rows:
   extent = row.Shape.extent
   array.add(extent.lowerLeft)
   array.add(extent.lowerRight)
   array.add(extent.upperRight)
   array.add(extent.upperLeft)
   array.add(extent.lowerLeft)
   polygon = arcpy.Polygon(array)
   ptList.append(polygon)
   array.removeAll()
del rows
arcpy.CopyFeatures_management(ptList, extentPoly)

In this code sample, it loops through the feature class and write the bounding box geometry to a python list. That list is then given as an input to CopyFeatures() and it writes it to disk. Notice that you can get the extent right from the Shape value from the row object. This makes life easy.

Here is a image of what the lower 48 would look like as extents:
The white lines are the extents.

Enjoy

Tuesday, July 12, 2011

Scripting Cache Clearing for ArcGIS Server

If you work with ArcGIS Server and publish geoprocessing task, you know that you need to clear the cache quite a bit at times.  Here is a script to help automate that process:
*** NOTE: THIS SHOULD NEVER BE PUBLISHED TO SERVER OR PUT IN A PRODUCTION ENVIRONMENT, USE AT YOUR OWN RISK ***


import urllib
import urllib2
import os
import json

import arcpy

username = str(arcpy.GetParameterAsText(0))
password = str(arcpy.GetParameterAsText(1))
baseAdminLoginURL = str(arcpy.GetParameterAsText(2))#example: "http://server/ArcGIS/rest/admin" #
baseTokenURL = baseAdminLoginURL + r"/generatetoken"
baseAdminURL = baseAdminLoginURL + r"/cache/clear"

#
# Get the TOKEN from the SERVER
#
try:
   tokenurl = baseTokenURL + r"?" + urllib.urlencode({"username":username}) + \
   "&" + urllib.urlencode({"password":password}) + \
   "&ip=&referer=&client=requestip&expiration=525600&f=json"
   token_request = urllib2.Request(tokenurl)
   response = urllib2.urlopen(token_request)
   json_raw = response.read()
   json_object = json.loads(json_raw)
   response.close()
   token = json_object['token']
   #
   # Clear the Cache from the Server
   #
   cache_url = baseAdminURL + "?token=" + token + "&f=json"
   cache_request = urllib2.Request(cache_url)
   response = urllib2.urlopen(cache_request)
   json_raw = response.read()
   json_object = json.loads(json_raw)
   response.close()
   arcpy.AddMessage(json_raw)
   print json_raw
   arcpy.SetParameterAsText(3, json_raw)
except:
   print 'could not clear cache'
   arcpy.AddError("COULD NOT CLEAR THE CACHE")


All you need to do after you get this script working is to create a toolbox and a tool reference and have the 3 text inputs of type string and 1 derived output of type text.

And just in case you missed this:
*** NOTE: THIS SHOULD NEVER BE PUBLISHED TO SERVER OR PUT IN A PRODUCTION ENVIRONMENT, USE AT YOUR OWN RISK ***

Monday, July 11, 2011

Moving Layer Position in Table of Contents

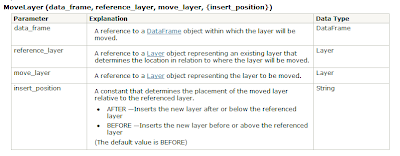
In the arcpy.mapping module there is a function called MoveLayer() which allows developers to move a layer to a specific location within a data frame or group layer in a map document.  It does not give you the ability to move layers between data frames and the moved layer and reference layer must reside in the same data frame as well.

To move layers between data frames, use the Add Layer, Insert Layer and Remove Layer functions.

Example: Move Layer Position

import arcpy
from arcpy import mapping
for lyr in mapping.ListLayers(mxd,"",df):
   if lyr.name == "layer1":
      moveLayer = lyr
   if lyr.name == "layer2":
      refLayer = lyr
mapping.MoveLayer(df,refLayer,moveLayer,"AFTER")
mxd.save()
del mxd

The final result will be that layer1 is below layer2:


Enjoy

Wednesday, July 6, 2011

Kicking off Idle Users from Windows Server

When working with servers that you remote into, sometimes people forget to log off, so you need to boot them. 

To query who is logged into a machine, do the following from the command prompt:

query session /server:SERVERNAME


You will be given the user's ID number to boot. Take that number, and boot the person:

rwinsta /server:SERVERNAME 1


Now you can log in.

Tuesday, July 5, 2011

Resetting Scripting Environmental Variables

To reset an environmental variable in ArcPy, use the ClearEnvironment().  This function will reset the environmental variable to it's default value.

Example: Setting then Clearing the Scratch Workspace

>>> import arcpy
>>> from arcpy import env
>>> env.scratchWorkspace = r"c:\temp"
>>> print env.scratchWorkspace
c:\temp
>>> arcpy.ClearEnvironment("scratchWorkspace")
>>> print env.scratchWorkspace
None


To learn more, check out the webhelp link.

Enjoy

Friday, July 1, 2011

ArcPy - Looking inside Group Layers

A group layer contains other layers. Group layers help organize related kinds of layers in a map and can be used to define advanced drawing options. For example, suppose you have two layers on a map representing railroads and highways. You could group these layers together and name the resulting layer Transportation Networks. If you need to, you can even create nested group layers (groups of group layers). (source: esri)

Now, let's say you have to do some analysis on layers inside the group layers, you can loop the layers as follows:


import arcpy
mxdPath = r"c:\temp\mapDoc.mxd"
mxd = arcpy.mapping.MapDocument(mxdPath)
layers = arcpy.mapping.ListLayers()
for layer in layers:
if layer.isGroupLayer:
for subLayer in layer:
print "This layer is in a group layer: " + str(subLayer.name)


This will print a list of layer contained in a groupLayer.

Wednesday, June 29, 2011

Silverlight Charting

Here is a great resource for developing Silverlight charts using the Silverlight Toolkit: http://cesso.org/Samples/ChartBuilder/

Thursday, June 23, 2011

Creating a PDF Document

One of the most interesting features with the mapping module in python is the ability to create a PDF document.  This feature can be used as the starting point of developing tools that can create map books.

The PDFDocument allows manipulation of PDF documents, including facilities for merging pages, setting document open behavior, adding file attachments, and creating or changing document security settings.  PDFDocumentOpen and PDFDocumentCreate are two functions that provide a reference to a PDFDocument object.

Example: Creating a Blank PDF Document

pdfPath = r"c:\temp\my.pdf"
pdfDoc = arcpy.mapping.PDFDocumentCreate(pdfPath)

#Commit changes and delete variable reference
pdfDoc.saveAndClose()
del pdfDoc

*Always call saveAndClose(), or the pdf will not appear on the file system.

Example: Opening a PDF Document and update properties

import arcpy
pdfDoc = arcpy.mapping.PDFDocumentOpen(r"C:\Project\ParcelAtlasMapBook.pdf")
pdfDoc.updateDocProperties(pdf_title="Atlas Map",
                           pdf_author="ESRI",
                           pdf_subject="Map Book",
                           pdf_keywords="Atlas; Map Books",
                           pdf_open_view="USE_THUMBS",
                           pdf_layout="SINGLE_PAGE")
pdfDoc.saveAndClose()
del pdfDoc


The mapping module in ArcPay allows for a host of properties to be updated as in the example above.

More examples and a full explanation of the object can be found here.

Wednesday, June 22, 2011

ArcPy's PictureElement Object

The PictureElement object provides access to properties that enable its reposition on the page layout as well as changing the images source.  Like previous posts, to get a reference to the PictureElement using the ListLayoutElements() which produces a list of page layout element objects.


Example: Changing the Datasource of a Picture Element

import arcpy
mxd = arcpy.mapping.MapDocument(r"C:\temp\Project.mxd")
for elm in arcpy.mapping.ListLayoutElements(mxd, "PICTURE_ELEMENT"):
   if elm.name == "Logo":
      elm.sourceImage = r"C:\temp\NewLogo.bmp"
mxd.save()
del mxd

Friday, June 17, 2011

AddIn Extension - Update Document Properties

A way to keep track of who accesses map documents is to create an extension that logs who last used the map document.  To do this, you need to wire events to the OpenDocument event.


        private void WireDocumentEvents()
        {
            // Named event handler
            ArcMap.Events.OpenDocument += new IDocumentEvents_OpenDocumentEventHandler(Events_OpenDocument);
         
        }

Call this event OnStartup(), so override it in the extension:

        protected override void OnStartup()
        {
            // Wire the events
             WireDocumentEvents();
        }

Next stub out the Events_OpenDocument()


        void Events_OpenDocument()
        {
            IMxDocument mxDoc = ArcMap.Document as IMxDocument;
            IDocumentInfo2 docInfo = mxDoc as IDocumentInfo2;
            docInfo.Comments += Environment.NewLine + "Opened On: " + DateTime.Now.ToString() + " by " + Environment.UserName;
            if (docInfo.RelativePaths == false)
            {
                docInfo.RelativePaths = true;
            }
        }

Now if you look at the Map Documents properties in ArcMap you'll see something like:
"Opened On: 06/17/2011 3:02 AM by Bob1234"

An additional option would be to tack in a Save() to save the document right away so the information doesn't get lost if the user exits ArcMap.


        private void Save()
        {
            ArcMap.Application.SaveDocument();
        }

Thursday, June 16, 2011

Using the TextElement Object

The TextElement Object provide access to properties that allows developers move and alter the text within a map document.  It changes text within a page layout and can be used on inserted text, call outs, rectangle text, titles, etc...  It is even dynamic enough to access grouped text elements. 

To find the TextElement on the page layout use the ListLayoutElement() with a filter of TEXT_ELEMENT for the type to return. 


import arcpy
from arcpy import mapping
mxd = mapping.MapDocument("CURRENT")
textElem = mapping.ListLayoutElements(mxd, "TEXT_ELEMENT")


Now a list of all TextElements are returned. The next step is to find the text element you want to change. Each TextElement has a property called 'name' and when you perform your cartographic duties, I strongly suggest you set this. It makes it easy to update the elements.


import arcpy
from arcpy import mapping
mxd = mapping.MapDocument("CURRENT")
textElem = mapping.ListLayoutElements(mxd, "TEXT_ELEMENT")
for elem in textElem:
   if elem.name == "txtTitle":
      elem.text = "Mr. Toads Wild Ride"
   elif elem.name == "txtCurrentDate":
      # make an element have dynamic text of current date
      elem.text = """<dyn format="short" type="date">"""

mxd.save()
del mxd


Now you might be thinking dynamic text, what the heck is that!?!? well it's exactly what it means, it's dynamic, it changes, and it's awesome. You can check out more here.

Wednesday, June 15, 2011

Advanced - Extending Search Cursor Object

The 'with' statement is used to wrap the execution of a block with functionality provided by a separate guard object.  The expression is evaluated once, and should yield a context guard, which is used to control execution of the suite. The guard can provide execution-specific data, which is assigned to the target (or target list). 

As a developer, think of a 'with' statement as a try/finally pattern

def opening(filename):
   f = open(filename)
   try:
      yield f
   finally:
      f.close()

This can now be viewed as:

with f = opening(filename):
   #...read data from f...

This makes writing code easier to understand, and you don't have to always remember to delete the object reference using the del().

How does this apply to the Cursor object? Well natively, the Cursor object does not support 'with' statement use. To extend the Cursor, more specifically SearchCursor, first create a class:

class custom_cursor(object):
   """
      Extension class of cursor to enable use of
      with statement
   """
   def __init__(self, cursor):
      self.cursor = cursor
   def __enter__(self):
      return self.cursor
   def __exit__(self, type, value, traceback):
      del self.cursor

Now you have an object called custom_cursor that has the minimum required class properties of __enter__() and __exit__(). Notice that __exit__() performs that annoying del() to remove the schema locks on our data.

How do you use this? It's not hard at all.  In this example, the function searchCursor() takes a feature class or table and a where clause (expression) and returns the results as an array of Row objects. 

def searchCursor(fc,expression=""):
   """
       Returns a collections of rows as an array of Row Objects
      :param fc: Feature Class or Table
      :param expression: Where Clause Statement (Optional)
      :rtype Rows: Array of Rows
  
   """
   rows = []
   with custom_cursor(arcpy.SearchCursor(fc,expression)) as cur:
      for row in cur:
         rows.append(row)
   return rows


The del() is taken care of automatically, and when the process is completed the __exit__() is called launching the del().

I got this idea from Sean Gillies Blog

Tuesday, June 14, 2011

The Legend Element

Continuing with the mapping module objects, leads me to start talking about cartography automation.  The LegendElement object allows developers to access properties that enables the altering of the legend on the page layout.  The LegendElement object has an association with a single data frame. 

Example: Add Layer to Legend

import arcpy
mxd = arcpy.mapping.MapDocument(r"C:\temp\BestMapEver.mxd")
df = arcpy.mapping.ListDataFrames(mxd)[0]
addLayer = r"c:\temp\World.lyr"
# Get the First Legend Object
#
legend = arcpy.mapping.ListLayoutElements(mxd, "LEGEND_ELEMENT", "Legend")[0]
legend.autoAdd = True
arcpy.mapping.AddLayer(df,addLayer,"BOTTOM")
mxd.save() # Now the map has the new layer which makes the map even better
del mxd


It's not too hard to do simple changing to map documents. All you need is a nice template to work off of, and you can alter the text, position and size of most map elements.

Monday, June 13, 2011

Working with NetCDF Data

What is a NetCDF file? It stands for Network Common Data Form (NetCDF). It's binary, self-describing, machine independent file format for storing scientific data, and ArcGIS supports this format!

To get the properties use the NetCDFFileProperties() and as a developer you can access the following Methods:


Some essential NetCDF vocabulary: (source)
Dimensions
A netCDF dimension has both a name and a size. A dimension size is an arbitrary positive integer. Only one dimension in a netCDF file can have the size UNLIMITED. Such a dimension is the unlimited dimension, or the record dimension. A variable with an unlimited dimension can grow to any length along that dimension.

A dimension can be used to represent a real physical dimension, for example, time, latitude, longitude, or height. A dimension can also be used to index other quantities, for example, station or model run number. It is possible to use the same dimension more than once in specifying a variable shape.

Variables
A variable represents an array of values of the same type. Variables are used to store the bulk of the data in a netCDF file. A variable has a name, a data type, and a shape described by its list of dimensions specified when the variable is created. The number of dimensions is called the rank (or dimensionality). A scalar variable has rank 0, a vector has rank 1, and a matrix has rank 2. A variable can also have associated attributes that can be added, deleted, or changed after the variable is created.

Coordinate variables
A one-dimensional variable with the same name as a dimension is called a coordinate variable. It is associated with a dimension of one or more data variables and typically defines a physical coordinate corresponding to that dimension.

Coordinate variables have no special meaning to the netCDF library. However, the software using this library should treat coordinate variables in a special way.

Attributes
NetCDF attributes are used to store ancillary data or metadata. Most attributes provide information about a specific variable. These attributes are identified by the name of the variable together with the name of the attribute.

Some attributes provide information about the entire netCDF file and are called global attributes. These attributes are identified by the attribute name together with a blank variable name (in CDL) or a special null variable ID (in C or Fortran).

Conventions
The conventions define metadata that provide a definitive description of the data in each variable and their spatial and temporal properties. A convention helps users of data from different sources decide which quantities are comparable. The name of the convention is presented as a global attribute in a netCDF file.


Example: Print out all Dimension Values

import arcpy

InNetCDF = r"C:\temp\tos_O1_2001-2002.nc"
try:
   ncFP = arcpy.NetCDFFileProperties(InNetCDF)
   ncDim = ncFP.getDimensions()
   # loop through all dimension and show the value
   for dim in ncDim:
      top = ncFP.getDimensionSize(dim)
      for i in range(0,top):
         print ncFP.getDimensionValue(dim,i)
except:
   print arcpy.GetMessages(2)


In addition to just listing the properties, ArcMap/Catalog has a whole set of multidimensional tools that can convert this data into feature classes, raster layers or table views.

A tutorial on NetCDF and ArcGIS can be found here.

You can grab some NOAA data here.

Enjoy

Friday, June 10, 2011

The DataFrame Object

The DataFrame object provides access to many of the data frame properties found in a map document.  This object is essentially a gateway to use other mapping functions.  To access the data frame, use the ListDataFrames(), which returns a list.  Iterate through the list to find the correct DataFrame object.  This object allows developers to set the credits, map description, extent, see the map units, set the data frames name, position on page layout, width/height on page layout, and many other.  The complete overview can be found here

Example: Zoom to Selected Features From

mxd = arcpy.mapping.MapDocument("CURRENT")
df = arcpy.mapping.ListDataFrames(mxd)[0]
df.zoomToSelectedFeatures()
del mxd

This example assumes you have layers already selected in the current map document.

Example: Changing Data Frame's Size and Position

import arcpy
mxd = arcpy.mapping.MapDocument(r"C:\temp\Project.mxd")
df = arcpy.mapping.ListDataFrames(mxd)[0]
df.elementPositionX, df.elementPositionY = 1, 1
df.elementHeight, df.elementWidth = 5, 6.5
mxd.save()
del mxd


Example: Spatial Query by Visible Extent

mxd = arcpy.mapping.MapDocument("CURRENT")
df = arcpy.mapping.ListDataFrames(mxd)[0]
layers = arcpy.mapping.ListLayers(mxd, "", df)
# Extent Polygon
extentPolygon = arcpy.Polygon(arcpy.Array([df.extent.lowerLeft,df.extent.lowerRight, df.extent.upperRight, df.extent.upperLeft]),
df.spatialReference)
# Select all features in current extent
for lyr in layers:
   arcpy.SelectLayerByLocation_management(lyr, "INTERSECT", extentPolygon, "", "NEW_SELECTION")
del mxd


Enjoy

Thursday, June 9, 2011

Exporting a Map Document to PDF

So you made a map, and you want to show it to everyone without printing it, well let's export it!
ExportToPDF() - exports the page layout or data frame of a map document to a PDF.

From Esri WebHelp:
PDF files are designed to be consistently viewable and printable across different platforms. They are commonly used for distributing documents on the Web and are becoming a standard interchange format for content delivery. ArcMap PDFs are editable in many graphics applications and retain annotation, labeling, and attribute data for map layers from the ArcMap table of contents. PDF exports from ArcMap support embedding of fonts and thus can display symbology correctly even if the user does not have ESRI fonts installed. PDF exports from ArcMap can define colors in CMYK or RGB values.

Example: Export Page Layout

import arcpy
ds = r"c:\temp\ds.mxd"
mxd = arcpy.mapping.MapDocument(ds)
arcpy.mapping.ExportToPDF(mxd, r"C:\temp\layout.pdf")
del mxd

Example: Export a Single Data Frame

import arcpy
mxd = arcpy.mapping.MapDocument(r"C:\temp\layout.mxd")
df = arcpy.mapping.ListDataFrames(mxd)[0]
arcpy.mapping.ExportToPDF(mxd, r"C:\Project\Output\ProjectDataFrame.pdf", df,
                          df_export_width=1600,
                          df_export_height=1200)
del mxd


You can find more information about ExportToPDF() here.

Wednesday, June 8, 2011

Introduction to Mapping Module

The arcpy.mapping module is a library that allows developers to open and alter ArcMap map documents (mxd) and layer files (lyr).

Example: Update Text Element in Map Document

mxd = arcpy.mapping.MapDocument(r"C:\GIS\TownCenter_2009.mxd")
for textElement in arcpy.mapping.ListLayoutElements(mxd, "TEXT_ELEMENT"):
   if textElement.text == "GIS Services Division 2009":
      textElement.text = "GIS Services Division 2010"
arcpy.mapping.ExportToPDF(mxd, r"C:\GIS\TownCenterUpdate_2010.pdf")
del mxd


The geoprocessing arcpy.mapping module is intended for use by anyone who needs to automate an ArcMap work flow.

Tuesday, June 7, 2011

The Polyline Object

A Polyline object is a shape defined by one or more paths, in which a path is a series of connected segments.


Method information can be found here.


Example: Creating a Polyline

import arcpy
coordList = [[[1,2], [2,4], [3,7]],
            [[6,8], [5,7], [7,2], [9,5]]]
# Create empty Point and Array objects
#
point = arcpy.Point()
array = arcpy.Array()

# A list that will hold each of the Polyline objects
#
featureList = []

for feature in coordList:
# For each coordinate pair, set the x,y properties and add to the
# Array object.
#
for coordPair in feature:
   point.X = coordPair[0]
   point.Y = coordPair[1]
   array.add(point)
   # Create a Polyline object based on the array of points
   #
   polyline = arcpy.Polyline(array)
   # Clear the array for future use
   #
   array.removeAll()
   # Append to the list of Polyline objects
   #
   featureList.append(polyline)

# Create a copy of the Polyline objects, by using featureList as input to
# the CopyFeatures tool.
#
arcpy.CopyFeatures_management(featureList, "c:/geometry/polylines.shp")

Monday, June 6, 2011

Python Tools for Visual Studios

Program in python, but miss that MS Visual Studios feel?  Yes?  Well I have the answer for you here.

PyTools is:
Python Tools for Visual Studio is a free & open source plug-in for Visual Studio 2010 from Microsoft's Technical Computing Group. PTVS enables developers to use all the major productivity features of Visual Studio to build Python code using either CPython or IronPython and adds new features such as using High Performance Computing clusters to scale your code. Together with one of the standard distros, you can turn Visual Studio into a powerful Technical Computing IDE...


Want it to work with ArcPy? Check this out.

Polygon Objects

The Polygon object is simply a collection of X,Y coordinates that form a closed shape in a connected sequence.

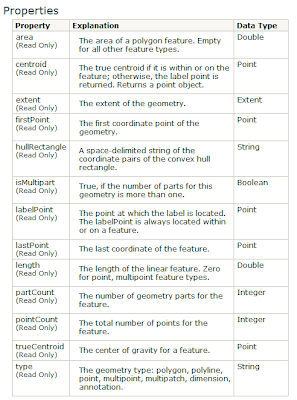
To create a polygon object, you need a List or Array of Points passed during instantiation at minimum.  There are 3 optional parameters: spatial reference, hasZ and hasM.  Here is more detailed explaination below:

This screen shot from the help in ArcGIS explains in details what each property and syntax means.  I do not need to really go into this because I assume everyone can read. The methods overview can be found here.

Example: Creating a Polygon Object From a List of Coordinates

import arcpy

# Triangle Coordinate List
#
cList = [[1,2],[2,2], [1,4]]

# Create a Point Object and Array
#
point = arcpy.Point()
array = arcpy.Array()

for feat in cList:
   point.X = feat[0]
   point.Y = feat[1]
   array.add(point)
   point = arcpy.Point()

# Close the shape
#
array.add(array.getObject(0))

# Create the polygon
#
polygon = arcpy.Polygon(array)

## DO OTHER TASKS ##

Friday, June 3, 2011

Geometry to GeoJSON

Working off of yesterday's post, the goal is converting the Geometry Objects back to GeoJSON. The geometry object has a method called __geo_interface__. It will work with Geometry, Multipoint, PointGeometry, Polygon, or Polyline classes.  It is not implemented on the Point object.

Example: Convert all features in a feature class to GeoJSON


import arcpy
from arcpy import env
import os
 

wrksp = r"c:\temp"
rows = None
row = None


env.workspace = wrksp


for ds in arcpy.ListFeatureClasses():
   print os.path.basename(ds)
   rows = arcpy.SearchCursor(ds)
   for row in rows:
      print row.getValue("Shape").__geo_interface__
   del rows, row


It's that simple to convert geometry to GeoJSON.

Thursday, June 2, 2011

GeoJSON to Geometry

Arcpy contains a helpful tool to convert GeoJSON objects to Geometry objects.  GeoJSON is a text representation of geographic features.  To convert GeoJSON to geometry use the AsShape(). This function can create the following geometries: Point, LineString, Polygon, MultiPoint, and MultiLineString.

GeoJSON Point to Point Geometry

import arcpy
gjPoint = {"type": "Point", "coordinates": [5.0, 5.0]}
ptGeometry = arcpy.AsShape(ptGeometry)


GeoJSON Multipoint to Multipoint Geometry

import arcpy
gjMultiPoint = {
"type": "MultiPoint",
"coordinates": [[5.0, 4.0], [8.0, 7.0]]}
multiPoint = arcpy.AsShape(gjMultiPoint)


GeoJSON Polyline to Polyline Geometry

import arcpy
gjLineString = {
"type": "LineString",
"coordinates": [[5.0, 4.0], [8.0, 7.0]]}
polyLine = arcpy.AsShape(gjLineString)


GeoJSON Polygon to Polygon Geometry

import arcpy
gjPolygon = {
"type": "Polygon",
"coordinates": [
[[10.0, 0.0], [20.0, 0.0], [20.0, 10.0], [10.0, 10.0], [10.0, 0.0]]]}
polygon = arcpy.AsShape(gjPolygon)


(sample code came from webhelp.esri.com)

Enjoy

Wednesday, June 1, 2011

Determining Error Types in Python

Many times when writing python code, you want to get some error feedback.  Python, like many other languages, has a try/catch or in this case a try/except/finally pattern where you can capture various errors:

Example: Simple Try/Except Pattern

try:
   a = 1/0
except:
   print 'error'
finally:
   print 'i'm done!'

The code will throw an error and go the to the except section of the code skipping everything else, but not much is being told to the developer.
Let's try to add a trace function that will capture the line where the error occurs and some other information:

import arcpy

def trace(self):
   import sys, traceback, inspect
   tb = sys.exc_info()[2]
   tbinfo = traceback.format_tb(tb)[0]
   # script name + line number
   line = tbinfo.split(", ")[1]
   filename = inspect.getfile( inspect.currentframe() )
   # Get Python syntax error
   #
   synerror = traceback.format_exc().splitlines()[-1]
   return line, filename, synerror


try:
   a=1/0
except:
   line, filename, err = trace()
   print "Python error on " + line + " of " + filename + " : with error - " + err
   arcpy.AddError("Python error on " + line + " of " + filename + " : with error - " + err)


Now we know more about the error than just 'error.' You can further expand your error handling by capturing arcpy errors verse everything else:

import arcpy

def trace(self):
   import sys, traceback, inspect
   tb = sys.exc_info()[2]
   tbinfo = traceback.format_tb(tb)[0]
   # script name + line number
   line = tbinfo.split(", ")[1]
   filename = inspect.getfile( inspect.currentframe() )
   # Get Python syntax error
   #
   synerror = traceback.format_exc().splitlines()[-1]
   return line, filename, synerror


try:
   a=1/0
except arcpy.ExecuteError:
   line, filename, err = trace()
   print "Geoprocessing error on " + line + " of " + filename + " :"
   arcpy.AddError("Geoprocessing error on " + line + " of " + filename + " :")
   arcpy.AddError(arcpy.GetMessages(2))
except:
   line, filename, err = trace()
   print "Python error on " + line + " of " + filename + " : with error - " + err
   arcpy.AddError("Python error on " + line + " of " + filename + " : with error - " + err)

Now you know if it's a python error or an arcpy error. Very cool and helpful

You can further break down error handling by creating custom error classes and use the raise method to call that class, but that's another time.

Tuesday, May 31, 2011

Using the Insert Cursor

This is my 4th article discussing the cursor objects in the ArcPy module.  In previous posts, I have talked about both search and update cursors in depth, so if you want to learn more about those, please feel free to search my earlier postings.

An InsertCursor inserts rows into a feature class or table.  The InsertCursor like the other cursor types returns an enumerable object that returns a row object.  New row objects can be created using a newRow() on the enumeration object (the cursor object).  After a row is created using the newRow(), use the insertRow() to save the newly created row into the existing table or feature class.

To create an InsertCursor, you just need to pass in a data set.  There is an optional parameter of spatial reference, which would be the spatial reference of the input data set, and a Cursor object is returned.
Here is a complete description:

Example of InsertCursor and a table

import arcpy
table = r"c:\temp\table.shp"
iCursor = arcpy.InsertCursor(table)
row = iCursor.newRow()
row.setValue("foo","bar")
iCursor.insertRow(row)
del iCursor
del row

In the example about, a single new row is created, and the field "foo" is filled with the value "bar" then inserted in the existing table.

Example of InsertCursor and a feature class

import arcpy

fc = r"C:\TEMP\pts.shp"
# Use the Describe() to get the Shape Field name
#
desc = arcpy.Describe(fc)
# Create the cursor
iCursor = arcpy.InsertCursor(fc)
# Create a new row
row = iCursor.newRow()
# Create new location
pt = arcpy.Point(-75,35)
# set the input values
row.setValue(desc.shapeFieldName, pt)
# insert the row
iCursor.insertRow(row)
# delete the cursor references to release
# schema locks
del iCursor
del row

Friday, May 27, 2011

Using the Update Cursors

The UpdateCursor() is a cursor object that allows for the update or deletion of rows in a feature class or table.  The cursor will place a lock on the data that will persist until the object is deleted or when the script terminates.

To create an UpdateCursor object, you must provide a data set on creation. As shown in the brief example below

ds = r"c:\temp\feat.shp"
uCursor = arcpy.UpdateCursor(ds)
# Do something with object


Here is a complete list of the optional and required parameters for UpdateCursor:
When you are done updating a row, call the updateRow() to commit your action that was performed on the row.

ds = r"c:\temp\feat.shp"
updateField = "Foo"
updateValue = "bar"
uCursor = arcpy.UpdateCursor(ds)
for row in uCursor:
   row.setValue(updateField,updateValue)
   row.updateRow(row)
del row, uCursor

In the above example, a feature class called feat.shp is having the field 'Foo' updated with the value 'bar'. Notice that the del function is called after the actions are performed. This should be done at the end of all cursor operation in order to drop the schema lock that is held on the data. If you do not, no other operations will be allowed on your data, and most likely the script will fail.

The deleteRow() on the UpdateCursor allows for the deletion of the current row of a table or feature class and is pretty straight forward to use:

ds = r"c:\temp\feat.shp"
uCursor = arcpy.UpdateCursor(ds)
for row in uCursor:
   uCursor.deleteRow(row)
del row, uCursor

This script example deletes all the rows in the data set.

Enjoy

Thursday, May 26, 2011

Point Geometry Object

A point geometry object is a shape that has no length or area at a given scale according to the web help or it can be considered a 0 dimension figure.  The PointGeometry object allows programmers to perform spatial operations without creating a feature class.  The object can be used as both inputs and outputs of geoprocessing.

Here is details about the PointGeometry object:
Details about the methods can be found here.

Example:

import arcpy
# coordinate list
ptList = [[35,-75],[14,-74],[28,-75]]
# create an empty point
pt = arcpy.Point()
# create list to hold PointGeometry objects
ptGeoms = []
for p in ptList:
   pt.x = p[0]
   pt.y = p[1]
   ptGeoms.append(arcpy.PointGeometry(pt))
# create a feature class from pointgeometry objects
arcpy.CopyFeatures_management(ptGeoms, r"in_memory\feat")


Enjoy

Wednesday, May 25, 2011

Point Object

The point object is used frequently with cursors.  Point features return a single object instead of an array of point objects, but all other feature types return an Array of point objects or an array containing multiple arrays of point objects if the feature is a multiple part feature.

A Point is not a geometry class, but used to create a geometry. 
Example:

point = arcpy.Point(-35,74)
ptGeom = arcpy.PointGeometry(point)


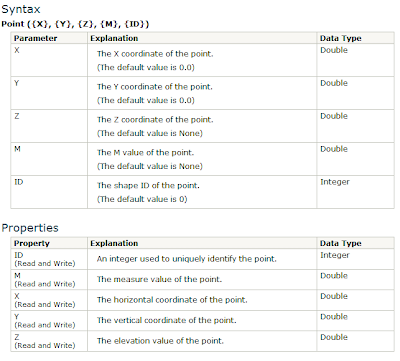
The properties of the Point object are as follows:
There are various methods introduced at v10: clone, contains, crosses, etc...  They can be found here.

This should get you started with Point objects. 

Enjoy

Friday, May 20, 2011

Get the Geometry Field

In order to work with geometry in python you need to first get the geometry field. To do that, use the Describe():

import arcpy
fc = r"c:\temp\feature.shp"
desc = arcpy.Describe(fc)
geomField = desc.shapeFieldName


To read the geometry use a search cursor to access the row's geometry field

rows = arcpy.SearchCursor(fc)
for row in rows:
   feat = row.getValue(geomField)
   # do something
del rows, row


Use the getPart() function to get dig into the actual geometry object.

Enjoy

Thursday, May 19, 2011

Search Cursors - Using Expressions

In the last post, search cursor basics were discussed.  When creating search cursors, you can specify many properties, one way to limit the number of row object returned to the end user is the use SQL expressions.


import arcpy
sqlExpression = "\"STATE_NAME\" = 'California'"
fc = r"c:\temp\counties.shp"
rows = arcpy.SearchCursor("C:/Data/Counties.shp", sqlExpression)
# Do stuff with rows


Here only the California counties will be returned.

Enjoy

Wednesday, May 18, 2011

Search Cursors

I couldn't say it better, so from the ArcGIS Help:
"The SearchCursor function establishes a read-only cursor on a feature class or table. The SearchCursor can be used to iterate through row objects and extract field values. The search can optionally be limited by a where clause or by field, and optionally sorted."

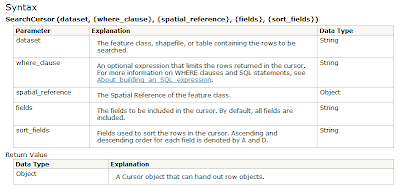
Looking Object Model of SearchCursor() we see the following:

Let do a example:

import arcpy
fc = arcpy.GetParameter(0)
rows = arcpy.SearchCursor(fc)
for row in rows:
   print 'hello rows!'
del rows

This is a very simple example where the end user would provide a feature class as an input and the output would be displayed for each row in the rows object.

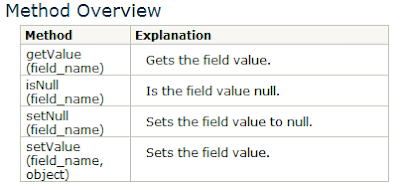
Not only is it import to understand cursors, but it's also important to understand what a cursor object will give you. It's a collection of Row objects. Row Objects have collection of methods that include getValue(), setValue(), inNull(), and setNull(). The names pretty much explain what each function does, but here is a graphic to explain it better:
If you use the web help like I often do to look up examples, how-to, etc.. for geoprocessing with python, you'll notice that many times the examples show a field value from a row being returned as such:

value = row.FieldName

Though there is nothing wrong with this, I do not prefer this method. I prefer calling the row method getValue().

value = row.getValue("FieldName")


Also remember, you cannot set values with a SearchCursor(), if you need to alter or add rows/features use the Update or Insert cursor objects.

Enjoy

Tuesday, May 17, 2011

Checking the Existence of Data

To check if data exists using the arcpy module, use the Exists().  This function tests for the existence of feature classes, tables, data sets, shapefiles, workspaces, layers, and other files in the current workspace at the time of execution.  The function will return a Boolean value (true/false) to let the end user know if the file exists.

Example: Check for Existences

import arcpy
from arcpy import env

env.workspace = r"c:\temp"
fc = sample.shp
if arcpy.Exists(fc):
   print "The sample.shp does exist"
else:
   print "The sample.shp does not exist"


Note
By default, when scripting, the results of any script or existing data is not to overwrite the data. To change that behavior, set the env.overwriteOutput to True. If data exists and the overwrite property is not set, it could cause an error to the thrown.

Monday, May 16, 2011

Spatial Reference Class

The other day, I was using the new data driven page tools found in the cartography section of ArcToolbox, and I noticed that the 'Grid Index Feature' tool will generate the incorrect sized grid cells if the spatial reference is not set when run outside of ArcMap. To fix this problem, use the spatial reference object and set the output spatial reference parameters to whatever coordinate system you are working with.

Before starting, you need to know what geographic or projected coordinate system needed to use for the tool.  Let's assume that WGS-1984 will be used which has a WKID of 4326.  It's a very common geographic coordinate system, so I won't go into any details about WGS-1984.

Usings the geographic coordinate systems references from the above provided links, create a spatial reference object based on the WKID.
Example: Using Factory Codes

import arcpy
from arcpy import env
WKID = 4326 # WGS-1984
sr = arcpy.SpatialReference()
sr.factoryCode = WKID
sr.create()
env.outputCoordinateSystem = sr


Now the default output coordinate system in WGS-1984.

There are many other ways to create a spatial reference obeject and they can be found here.

Enjoy

Friday, May 13, 2011

A Tip: Writing Queries Expression for Feature Class in Python

I see this question posted many times and it goes something like this: "Help, I've fallen and my SQL expression won't work!"  Well not exactly, but here is my tip.  Always use AddFieldDelimiters() if you don't know how to the field name should be formatted for a SQL query.

Example:

import arcpy

fc = "c:\temp\data.mdb/Stores"
fieldname = "ShopType"

# Create field name with the proper delimiters
#
field = arcpy.AddFieldDelimiters(fc, fieldname)
# Create a search cursor using an SQL expression
#
rows = arcpy.SearchCursor(fc, field + " = 2")
for row in rows:
     #do something
del rows


Enjoy

Thursday, May 12, 2011

Describing Data

Since you can work with all types of data geoprocessing, sometimes you want to know some additional information about the dataset than just its path.  The describe function is the tool you should use to examine dataset's properties.  For example, say you want to know what type of geometry a shapefile is:

Example: Determine Shape Type

fc = r"c:\temp\myshape.shp
desc = arcpy.Describe(fc)
print desc.shapeType

This block of code will output a string telling the end user the type of geometry used for this shapefile.

In general, the Describe function returns a Describe object. The output of Describe contains various properties, such as data type, fields, indexes, etc... The objects properties are dynamic which means that the data type will determine what properties are returned.

All Describe object will have the same base properties:

Common Describe Properties
 After that, the properties vary depending on data type and it is recommended that developers read up on the various data type properties found here.

Enjoy