Tuesday, May 31, 2011

Using the Insert Cursor

This is my 4th article discussing the cursor objects in the ArcPy module.  In previous posts, I have talked about both search and update cursors in depth, so if you want to learn more about those, please feel free to search my earlier postings.

An InsertCursor inserts rows into a feature class or table.  The InsertCursor like the other cursor types returns an enumerable object that returns a row object.  New row objects can be created using a newRow() on the enumeration object (the cursor object).  After a row is created using the newRow(), use the insertRow() to save the newly created row into the existing table or feature class.

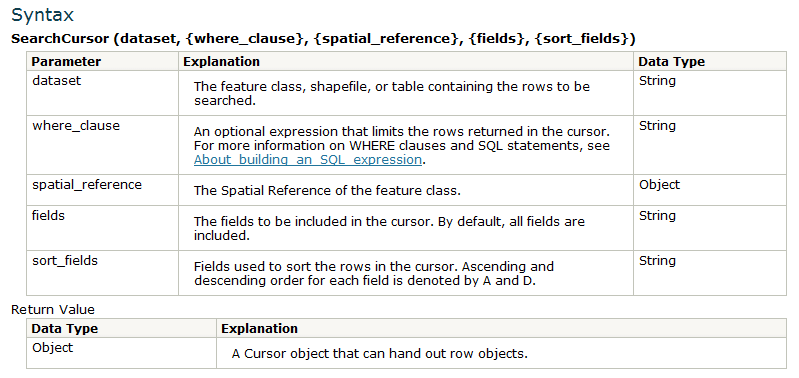
To create an InsertCursor, you just need to pass in a data set.  There is an optional parameter of spatial reference, which would be the spatial reference of the input data set, and a Cursor object is returned.
Here is a complete description:

Example of InsertCursor and a table

import arcpy
table = r"c:\temp\table.shp"
iCursor = arcpy.InsertCursor(table)
row = iCursor.newRow()
row.setValue("foo","bar")
iCursor.insertRow(row)
del iCursor
del row

In the example about, a single new row is created, and the field "foo" is filled with the value "bar" then inserted in the existing table.

Example of InsertCursor and a feature class

import arcpy

fc = r"C:\TEMP\pts.shp"
# Use the Describe() to get the Shape Field name
#
desc = arcpy.Describe(fc)
# Create the cursor
iCursor = arcpy.InsertCursor(fc)
# Create a new row
row = iCursor.newRow()
# Create new location
pt = arcpy.Point(-75,35)
# set the input values
row.setValue(desc.shapeFieldName, pt)
# insert the row
iCursor.insertRow(row)
# delete the cursor references to release
# schema locks
del iCursor
del row

Friday, May 27, 2011

Using the Update Cursors

The UpdateCursor() is a cursor object that allows for the update or deletion of rows in a feature class or table.  The cursor will place a lock on the data that will persist until the object is deleted or when the script terminates.

To create an UpdateCursor object, you must provide a data set on creation. As shown in the brief example below

ds = r"c:\temp\feat.shp"
uCursor = arcpy.UpdateCursor(ds)
# Do something with object


Here is a complete list of the optional and required parameters for UpdateCursor:
When you are done updating a row, call the updateRow() to commit your action that was performed on the row.

ds = r"c:\temp\feat.shp"
updateField = "Foo"
updateValue = "bar"
uCursor = arcpy.UpdateCursor(ds)
for row in uCursor:
   row.setValue(updateField,updateValue)
   row.updateRow(row)
del row, uCursor

In the above example, a feature class called feat.shp is having the field 'Foo' updated with the value 'bar'. Notice that the del function is called after the actions are performed. This should be done at the end of all cursor operation in order to drop the schema lock that is held on the data. If you do not, no other operations will be allowed on your data, and most likely the script will fail.

The deleteRow() on the UpdateCursor allows for the deletion of the current row of a table or feature class and is pretty straight forward to use:

ds = r"c:\temp\feat.shp"
uCursor = arcpy.UpdateCursor(ds)
for row in uCursor:
   uCursor.deleteRow(row)
del row, uCursor

This script example deletes all the rows in the data set.

Enjoy

Thursday, May 26, 2011

Point Geometry Object

A point geometry object is a shape that has no length or area at a given scale according to the web help or it can be considered a 0 dimension figure.  The PointGeometry object allows programmers to perform spatial operations without creating a feature class.  The object can be used as both inputs and outputs of geoprocessing.

Here is details about the PointGeometry object:
Details about the methods can be found here.

Example:

import arcpy
# coordinate list
ptList = [[35,-75],[14,-74],[28,-75]]
# create an empty point
pt = arcpy.Point()
# create list to hold PointGeometry objects
ptGeoms = []
for p in ptList:
   pt.x = p[0]
   pt.y = p[1]
   ptGeoms.append(arcpy.PointGeometry(pt))
# create a feature class from pointgeometry objects
arcpy.CopyFeatures_management(ptGeoms, r"in_memory\feat")


Enjoy

Wednesday, May 25, 2011

Point Object

The point object is used frequently with cursors.  Point features return a single object instead of an array of point objects, but all other feature types return an Array of point objects or an array containing multiple arrays of point objects if the feature is a multiple part feature.

A Point is not a geometry class, but used to create a geometry. 
Example:

point = arcpy.Point(-35,74)
ptGeom = arcpy.PointGeometry(point)


The properties of the Point object are as follows:
There are various methods introduced at v10: clone, contains, crosses, etc...  They can be found here.

This should get you started with Point objects. 

Enjoy

Friday, May 20, 2011

Get the Geometry Field

In order to work with geometry in python you need to first get the geometry field. To do that, use the Describe():

import arcpy
fc = r"c:\temp\feature.shp"
desc = arcpy.Describe(fc)
geomField = desc.shapeFieldName


To read the geometry use a search cursor to access the row's geometry field

rows = arcpy.SearchCursor(fc)
for row in rows:
   feat = row.getValue(geomField)
   # do something
del rows, row


Use the getPart() function to get dig into the actual geometry object.

Enjoy

Thursday, May 19, 2011

Search Cursors - Using Expressions

In the last post, search cursor basics were discussed.  When creating search cursors, you can specify many properties, one way to limit the number of row object returned to the end user is the use SQL expressions.


import arcpy
sqlExpression = "\"STATE_NAME\" = 'California'"
fc = r"c:\temp\counties.shp"
rows = arcpy.SearchCursor("C:/Data/Counties.shp", sqlExpression)
# Do stuff with rows


Here only the California counties will be returned.

Enjoy

Wednesday, May 18, 2011

Search Cursors

I couldn't say it better, so from the ArcGIS Help:
"The SearchCursor function establishes a read-only cursor on a feature class or table. The SearchCursor can be used to iterate through row objects and extract field values. The search can optionally be limited by a where clause or by field, and optionally sorted."

Looking Object Model of SearchCursor() we see the following:

Let do a example:

import arcpy
fc = arcpy.GetParameter(0)
rows = arcpy.SearchCursor(fc)
for row in rows:
   print 'hello rows!'
del rows

This is a very simple example where the end user would provide a feature class as an input and the output would be displayed for each row in the rows object.

Not only is it import to understand cursors, but it's also important to understand what a cursor object will give you. It's a collection of Row objects. Row Objects have collection of methods that include getValue(), setValue(), inNull(), and setNull(). The names pretty much explain what each function does, but here is a graphic to explain it better:
If you use the web help like I often do to look up examples, how-to, etc.. for geoprocessing with python, you'll notice that many times the examples show a field value from a row being returned as such:

value = row.FieldName

Though there is nothing wrong with this, I do not prefer this method. I prefer calling the row method getValue().

value = row.getValue("FieldName")


Also remember, you cannot set values with a SearchCursor(), if you need to alter or add rows/features use the Update or Insert cursor objects.

Enjoy

Tuesday, May 17, 2011

Checking the Existence of Data

To check if data exists using the arcpy module, use the Exists().  This function tests for the existence of feature classes, tables, data sets, shapefiles, workspaces, layers, and other files in the current workspace at the time of execution.  The function will return a Boolean value (true/false) to let the end user know if the file exists.

Example: Check for Existences

import arcpy
from arcpy import env

env.workspace = r"c:\temp"
fc = sample.shp
if arcpy.Exists(fc):
   print "The sample.shp does exist"
else:
   print "The sample.shp does not exist"


Note
By default, when scripting, the results of any script or existing data is not to overwrite the data. To change that behavior, set the env.overwriteOutput to True. If data exists and the overwrite property is not set, it could cause an error to the thrown.

Monday, May 16, 2011

Spatial Reference Class

The other day, I was using the new data driven page tools found in the cartography section of ArcToolbox, and I noticed that the 'Grid Index Feature' tool will generate the incorrect sized grid cells if the spatial reference is not set when run outside of ArcMap. To fix this problem, use the spatial reference object and set the output spatial reference parameters to whatever coordinate system you are working with.

Before starting, you need to know what geographic or projected coordinate system needed to use for the tool.  Let's assume that WGS-1984 will be used which has a WKID of 4326.  It's a very common geographic coordinate system, so I won't go into any details about WGS-1984.

Usings the geographic coordinate systems references from the above provided links, create a spatial reference object based on the WKID.
Example: Using Factory Codes

import arcpy
from arcpy import env
WKID = 4326 # WGS-1984
sr = arcpy.SpatialReference()
sr.factoryCode = WKID
sr.create()
env.outputCoordinateSystem = sr


Now the default output coordinate system in WGS-1984.

There are many other ways to create a spatial reference obeject and they can be found here.

Enjoy

Friday, May 13, 2011

A Tip: Writing Queries Expression for Feature Class in Python

I see this question posted many times and it goes something like this: "Help, I've fallen and my SQL expression won't work!"  Well not exactly, but here is my tip.  Always use AddFieldDelimiters() if you don't know how to the field name should be formatted for a SQL query.

Example:

import arcpy

fc = "c:\temp\data.mdb/Stores"
fieldname = "ShopType"

# Create field name with the proper delimiters
#
field = arcpy.AddFieldDelimiters(fc, fieldname)
# Create a search cursor using an SQL expression
#
rows = arcpy.SearchCursor(fc, field + " = 2")
for row in rows:
     #do something
del rows


Enjoy

Thursday, May 12, 2011

Describing Data

Since you can work with all types of data geoprocessing, sometimes you want to know some additional information about the dataset than just its path.  The describe function is the tool you should use to examine dataset's properties.  For example, say you want to know what type of geometry a shapefile is:

Example: Determine Shape Type

fc = r"c:\temp\myshape.shp
desc = arcpy.Describe(fc)
print desc.shapeType

This block of code will output a string telling the end user the type of geometry used for this shapefile.

In general, the Describe function returns a Describe object. The output of Describe contains various properties, such as data type, fields, indexes, etc... The objects properties are dynamic which means that the data type will determine what properties are returned.

All Describe object will have the same base properties:

Common Describe Properties
 After that, the properties vary depending on data type and it is recommended that developers read up on the various data type properties found here.

Enjoy

Wednesday, May 11, 2011

Streamlining Geo-enabled Lists for SharePoint 2010

If you use ArcGIS for SharePoint you will be creating Geo-enabled Lists multiple times.  To save time and effort, create a list template so you can reuse the same basic list structure over and over again.

1. Create a new blank and custom list

2. Name the list something memorable, like geo-enabled list
3. Add your fields to geocode against
  • Example: Address,City,State,Zip_Code

4. Add a 'ShapeX' and 'ShapeY' column as numbers
5. Add a Location Column name 'Location'
  • When Creating the location column, fill out all the geocoding information
6. Attach a geocoding workflow to the list (optional)
7. Once all your columns are added, click on list settings on the ribbon

8. Click on 'save as template'

9. Enter in a template name and save the list template

The list should now appear in the list template gallery.

Enjoy

Monday, May 9, 2011

Using fields and indexes

Feature classes and tables have fields properties that returns a list of fields objects when described.  Each field or index object has a number of properties that can be used to explore the object.  Alternately, the ListFields() and ListIndexes() can be used to also create the same lists. 

Example:

# Describe feature class
#
desc = arcpy.Describe(fc)
# Get Fields
#
fields = desc.fields
for field in fields:
   # do something with the field
   print field. name


The properties of the field and index object are below:
Enjoy

Friday, May 6, 2011

Setting paths to data in Python ie the '\'

Python treat the backslash (\) as an escape character.  For example, \n represents a new line, \t is a tab, etc...  When specifying a path, a forward slash (/) can be used in place of a backslash.  Two backslashes can can also be used instead of one to avoid syntax error.  A string literal can also be used by placing the letter r before a string.

Example: Correct way
 

>>> import arcpy
>>> arcpy.GetCount_management("c:/temp/streams.shp")
>>> arcpy.GetCount_management("c:\\temp\\streams.shp")
>>> arcpy.GetCount_management(r"c:\temp\streams.shp")

Example: Incorrect Way

>>> arcpy.GetCount_management("c:\temp\streams.shp")
# ExecuteError: Failed to execute. Parameters are not valid.
# ERROR 000732: Input Rows: Dataset c: em\streams.shp does not exist or is not supported
# Failed to execute (GetCount)


Enjoy

Thursday, May 5, 2011

Listing Data with ArcPy

ArcPy has a number of functions built into the package that perform list operations.  From the web help here is the complete list at ArcGIS 10.
The results of each of the above function is a python list containing the data you want.  A list in scripting can contain any data type.  To access the data, use looping to iterate through the list and get the values.

Example: Listing Feature Classes in a Workspace

import arcpy
from arcpy import env

# Set the workspace. List all of the feature classes that start with 'G'
#
env.workspace = r"c:\temp\data.gdb"
fcs = arcpy.ListFeatureClasses("G*")

The results of this is a list of feature classes in the env.workspace path. The variable fcs is an array of paths to each feature class begining with the letter G.

Example: Using List Results

# Set the workspace. List all of the TIFF files
#
env.workspace= r"c:\temp\images"

# Gets a list of raster data (TIF)
#
for tiff in arcpy.ListRasters("*", "TIF"):
print tiff

Here we can a simple process that takes the list data and prints the results back to the user. The only returned results are of type Tagged Image File Format. If no images of that file type are found, then an empty array is returned.

List Function Type Keywords
The keywords for the list functions return what is returned to the user in the list.  Here is the list of key words as found in the ArcGIS 10 help documentation:


Enjoy

Wednesday, May 4, 2011

Arcpy Envrionmental Variables in Python

Esri's arcpy library has a common set of parameters that it uses among all it's tools.  These parameters are originally obtained from the geoprocessing environment that all tools use during execution.  When a tool is launched, the script/model/tool goes out and grab the general environmental settings. 

From the help:
"When a script is run inside a tool from an ArcGIS application or from another geoprocessing script, the environment settings used by the calling application or script are passed to it. These settings become the default settings used by the tool's script when it is executed. The called script may alter the settings passed to it, but those changes are only used within that script or by any other tool it may call."
The environmental settings are exposed as properties on the env class.  These properties can be used to retrieve the default values and to set custom values. 

Setting Workspace Example:

>>> import arcpy
>>> from arcpy import env
>>> env.workspace = "c:/data"

To get a python list of all envrionmental values do the following:

>>> import arcpy
>>> print arcpy.ListEnvironments()

You can load and save envrionmental settings to a file using the

>>> # Load settings
>>> arcpy.LoadSettings(file)
>>> # Save Settings
>>> arcpy.SaveSettings(saveFile)


Enjoy

Tuesday, May 3, 2011

Calling Tools and Models from Python

In general, Python is only aware of the out of the box geoprocessing functionality and not custom tools created by the end user. These tools can by accessed via Python much like the 'import' method used in the last post.  To access a custom made toolbox and tool from Python use the ImportToolbox().  After importing the toolbox, the custom tools can be accessed as:

>>> arcpy.ImportToolbox(".tbx")
# Run the imported tool
#
>>> arcpy.toolname_alias(parameters)


When accessing tools using the arcpy package, the toolbox alias is extremely important. If a unique name is not used, then the system will not know what tool to run.

When working with server, published geoprocessing tasks can be imported as well:

>>> arcpy.ImportToolbox("http://server/arcgis/services;BufferByVal")


Enjoy

Monday, May 2, 2011

Importing: The Basics

Everyday, when I look at the forums, there are always many posts asking for help because they are new at programming in python.  To start, you need to load the ArcGIS Python library into the python script.  To access the library, use the import function to access the 'arcpy' library.

Simple Examples:

import arcpy


Now you can begin using all the modules, libraries and classes contained within the ArcGIS Python Library.

Let's say we just need the Spatial Analyst libraries. Instead of loading the whole library, just load part of the arcpy library.


from arcpy import sa


The Geo-statistical analyst module

from arcpy import ga

The mapping module

from arcpy import mapping

This can be done for all the python modules, and it allows users to load just what they want.