import arcpy

sqlExpression = "\"STATE_NAME\" = 'California'"

fc = r"c:\temp\counties.shp"

rows = arcpy.SearchCursor("C:/Data/Counties.shp", sqlExpression)

# Do stuff with rows
Here only the California counties will be returned.
Enjoy
import arcpy
sqlExpression = "\"STATE_NAME\" = 'California'"
fc = r"c:\temp\counties.shp"
rows = arcpy.SearchCursor("C:/Data/Counties.shp", sqlExpression)
# Do stuff with rows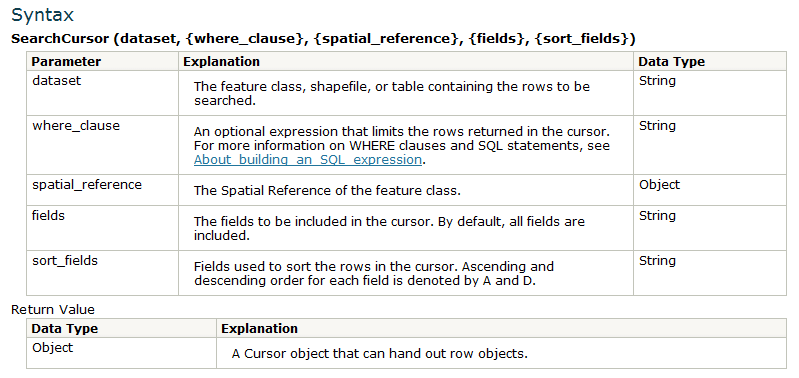
import arcpy

fc = arcpy.GetParameter(0)

rows = arcpy.SearchCursor(fc)

for row in rows:

   print 'hello rows!'

del rows

value = row.FieldName
value = row.getValue("FieldName")
import arcpy

from arcpy import env


env.workspace = r"c:\temp"

fc = sample.shp

if arcpy.Exists(fc):

   print "The sample.shp does exist"

else:

   print "The sample.shp does not exist"
import arcpy

from arcpy import env

WKID = 4326 # WGS-1984

sr = arcpy.SpatialReference()

sr.factoryCode = WKID

sr.create()

env.outputCoordinateSystem = sr
import arcpy


fc = "c:\temp\data.mdb/Stores"

fieldname = "ShopType"


# Create field name with the proper delimiters

#

field = arcpy.AddFieldDelimiters(fc, fieldname)

# Create a search cursor using an SQL expression

#

rows = arcpy.SearchCursor(fc, field + " = 2")

for row in rows:

     #do something

del rows
fc = r"c:\temp\myshape.shp

desc = arcpy.Describe(fc)

print desc.shapeType |
| Common Describe Properties |